Fireberry Credits
Fireberry credits are virtual tokens that can be used to perform various consumption actions in the system, such as sending WhatsApp messages, running AI operations, and more. Credits operate on a monthly model, meaning that each month the available credit balance in your account is refreshed according to your subscription. Every new and existing customer in the system receives an initial allocation of credits to their account. If this amount does not meet your organization’s needs, you will need to purchase additional credits.
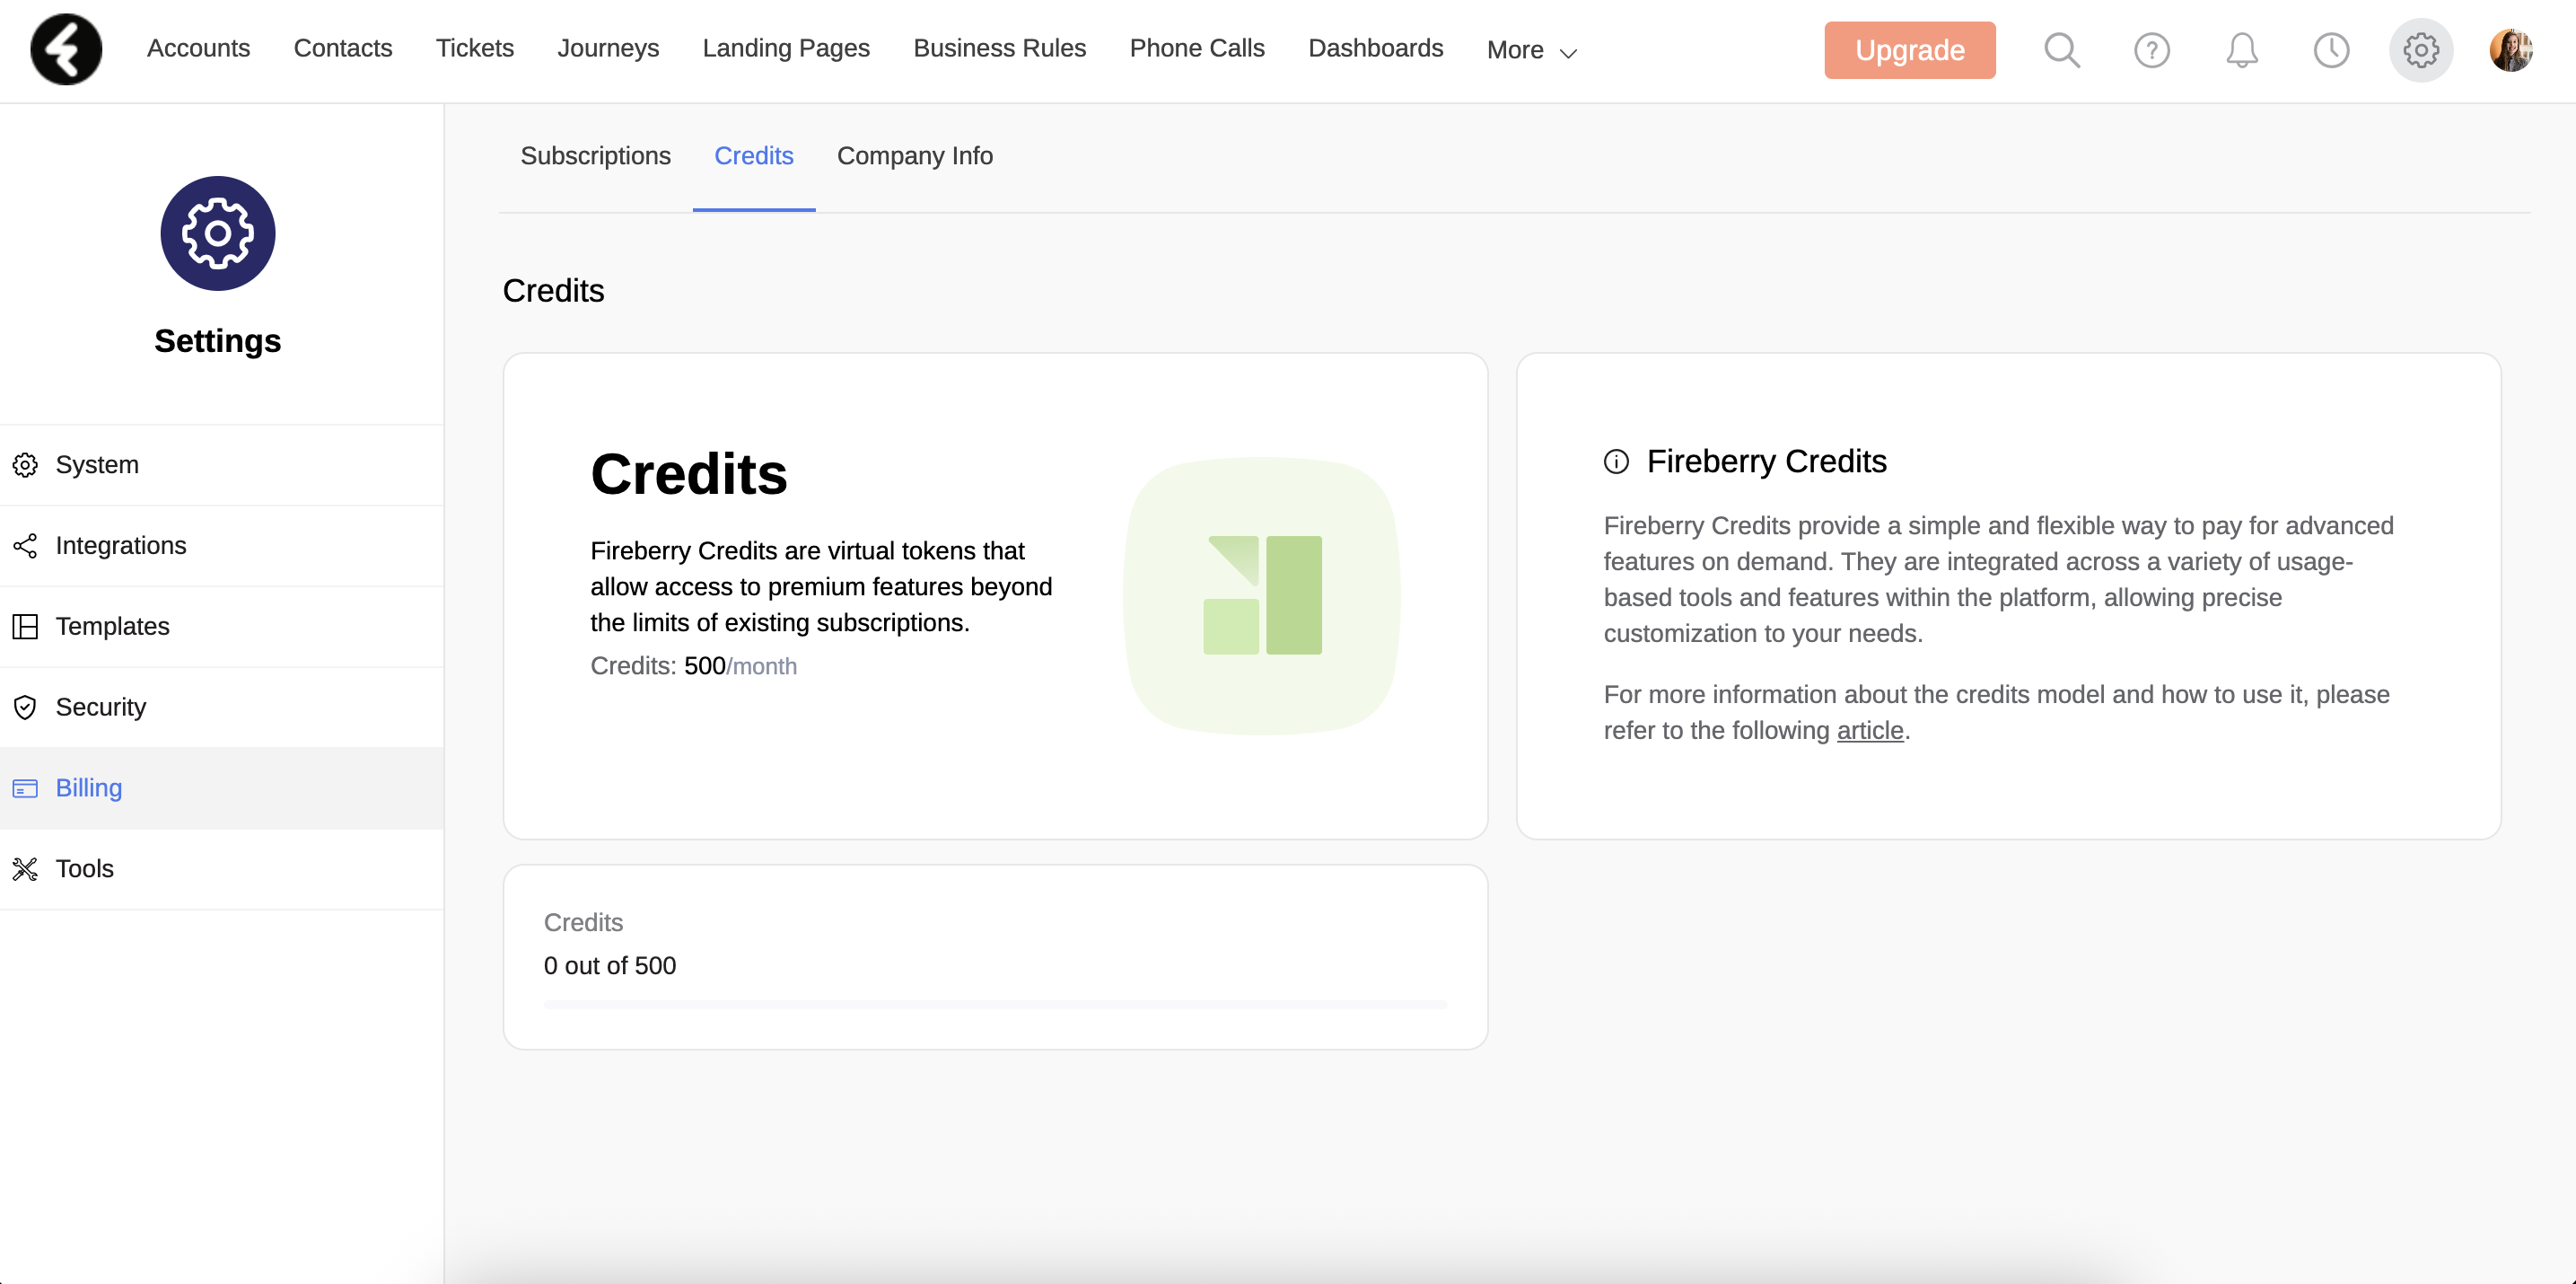
To purchase more credits and view your current credit balance, go to System Settings. Under the Account & Billing tab, you will find a section called Credits. On this screen, you can view your subscription details (if you have an active credits subscription) and get a full overview of the number of credits used compared to the total available credits for the current billing cycle.
Each action in the system that requires credits has a different credit cost. For example, sending a WhatsApp message consumes a certain number of credits, while performing an AI operation consumes a different amount. To understand the credit requirements for each action, refer to the Additional Services Price List.
Customers Without a Credit Subscription
In each billing cycle, Fireberry grants you an initial amount of credits that can be used for various actions within the system. Once this allocation is exceeded, those actions will stop working, and you will not be able to perform new actions until the next billing cycle. For example, processes such as sending WhatsApp messages through Journeys, automations, and more will cease to function.
This overage will be visible in the Credits Page Consumption Bar, which will appear in red and display an Upgrade button. To resume performing actions in the system, you will need to purchase one of the available subscription plans.
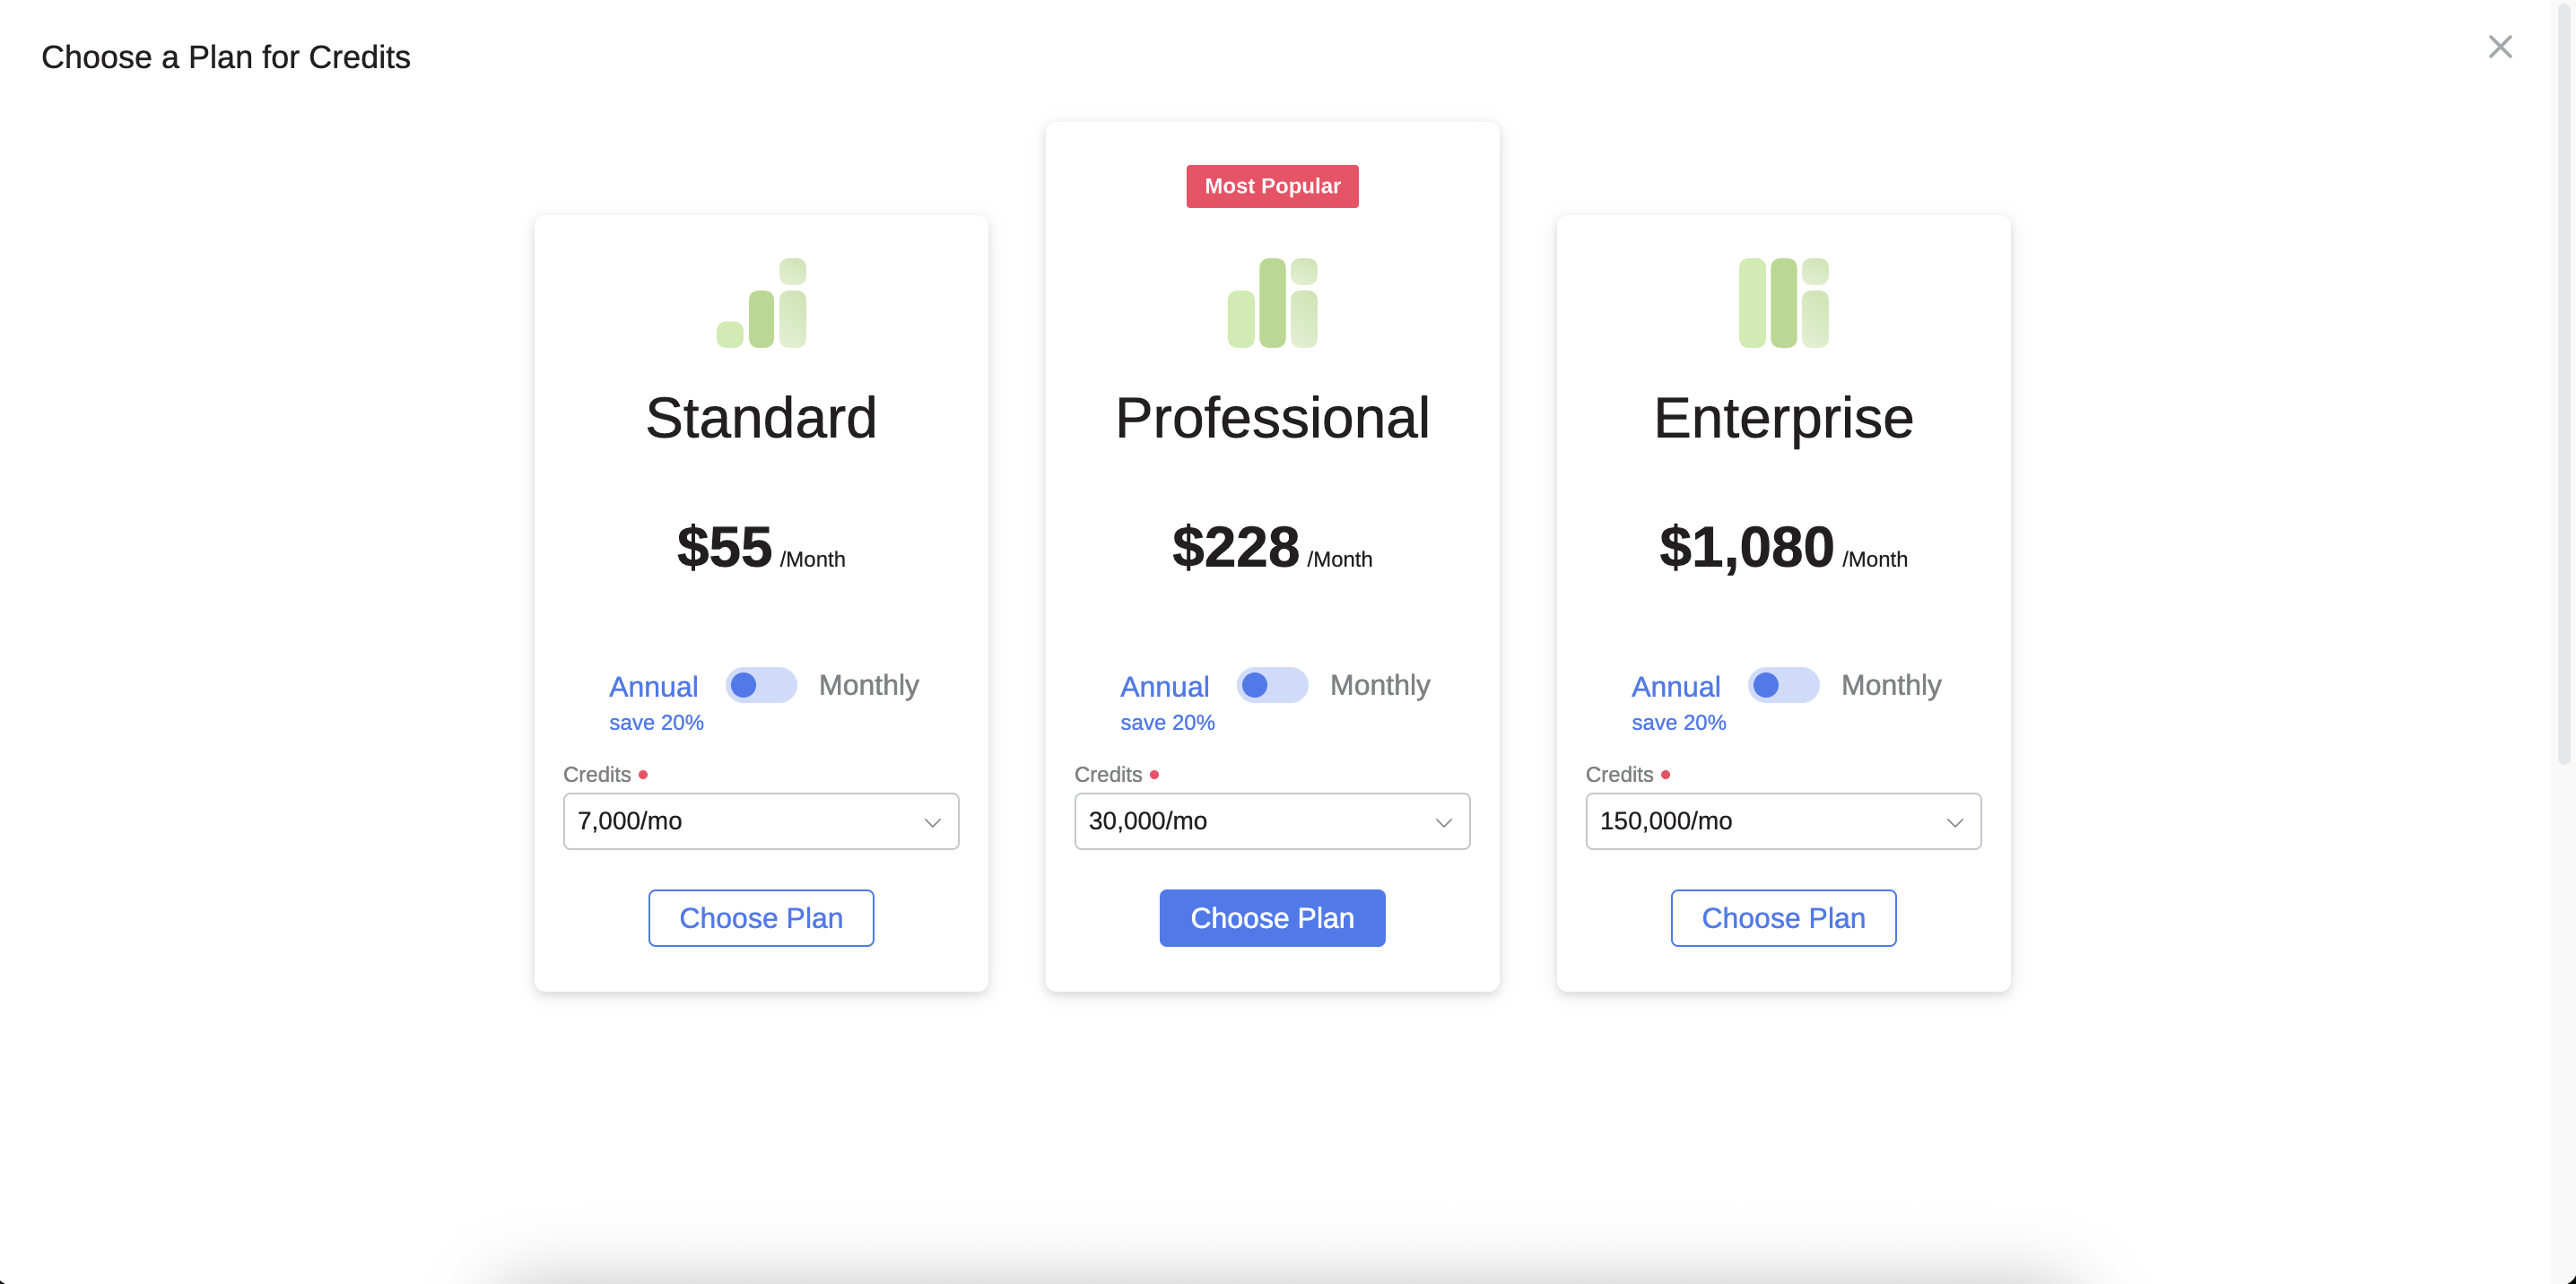
To purchase additional credits, click the Purchase button. You will then be redirected to a screen where you can select a plan. In each plan, you will be asked to choose the commitment type: monthly or annual billing, as well as the number of monthly credits you wish to purchase. After selecting your plan, click Choose Plan, and you will be redirected to the payment screen. Once payment is successful, you will return to the Credits screen, where you will see your subscription activated and your available credit balance updated.
Customers With an Active Credit Subscription
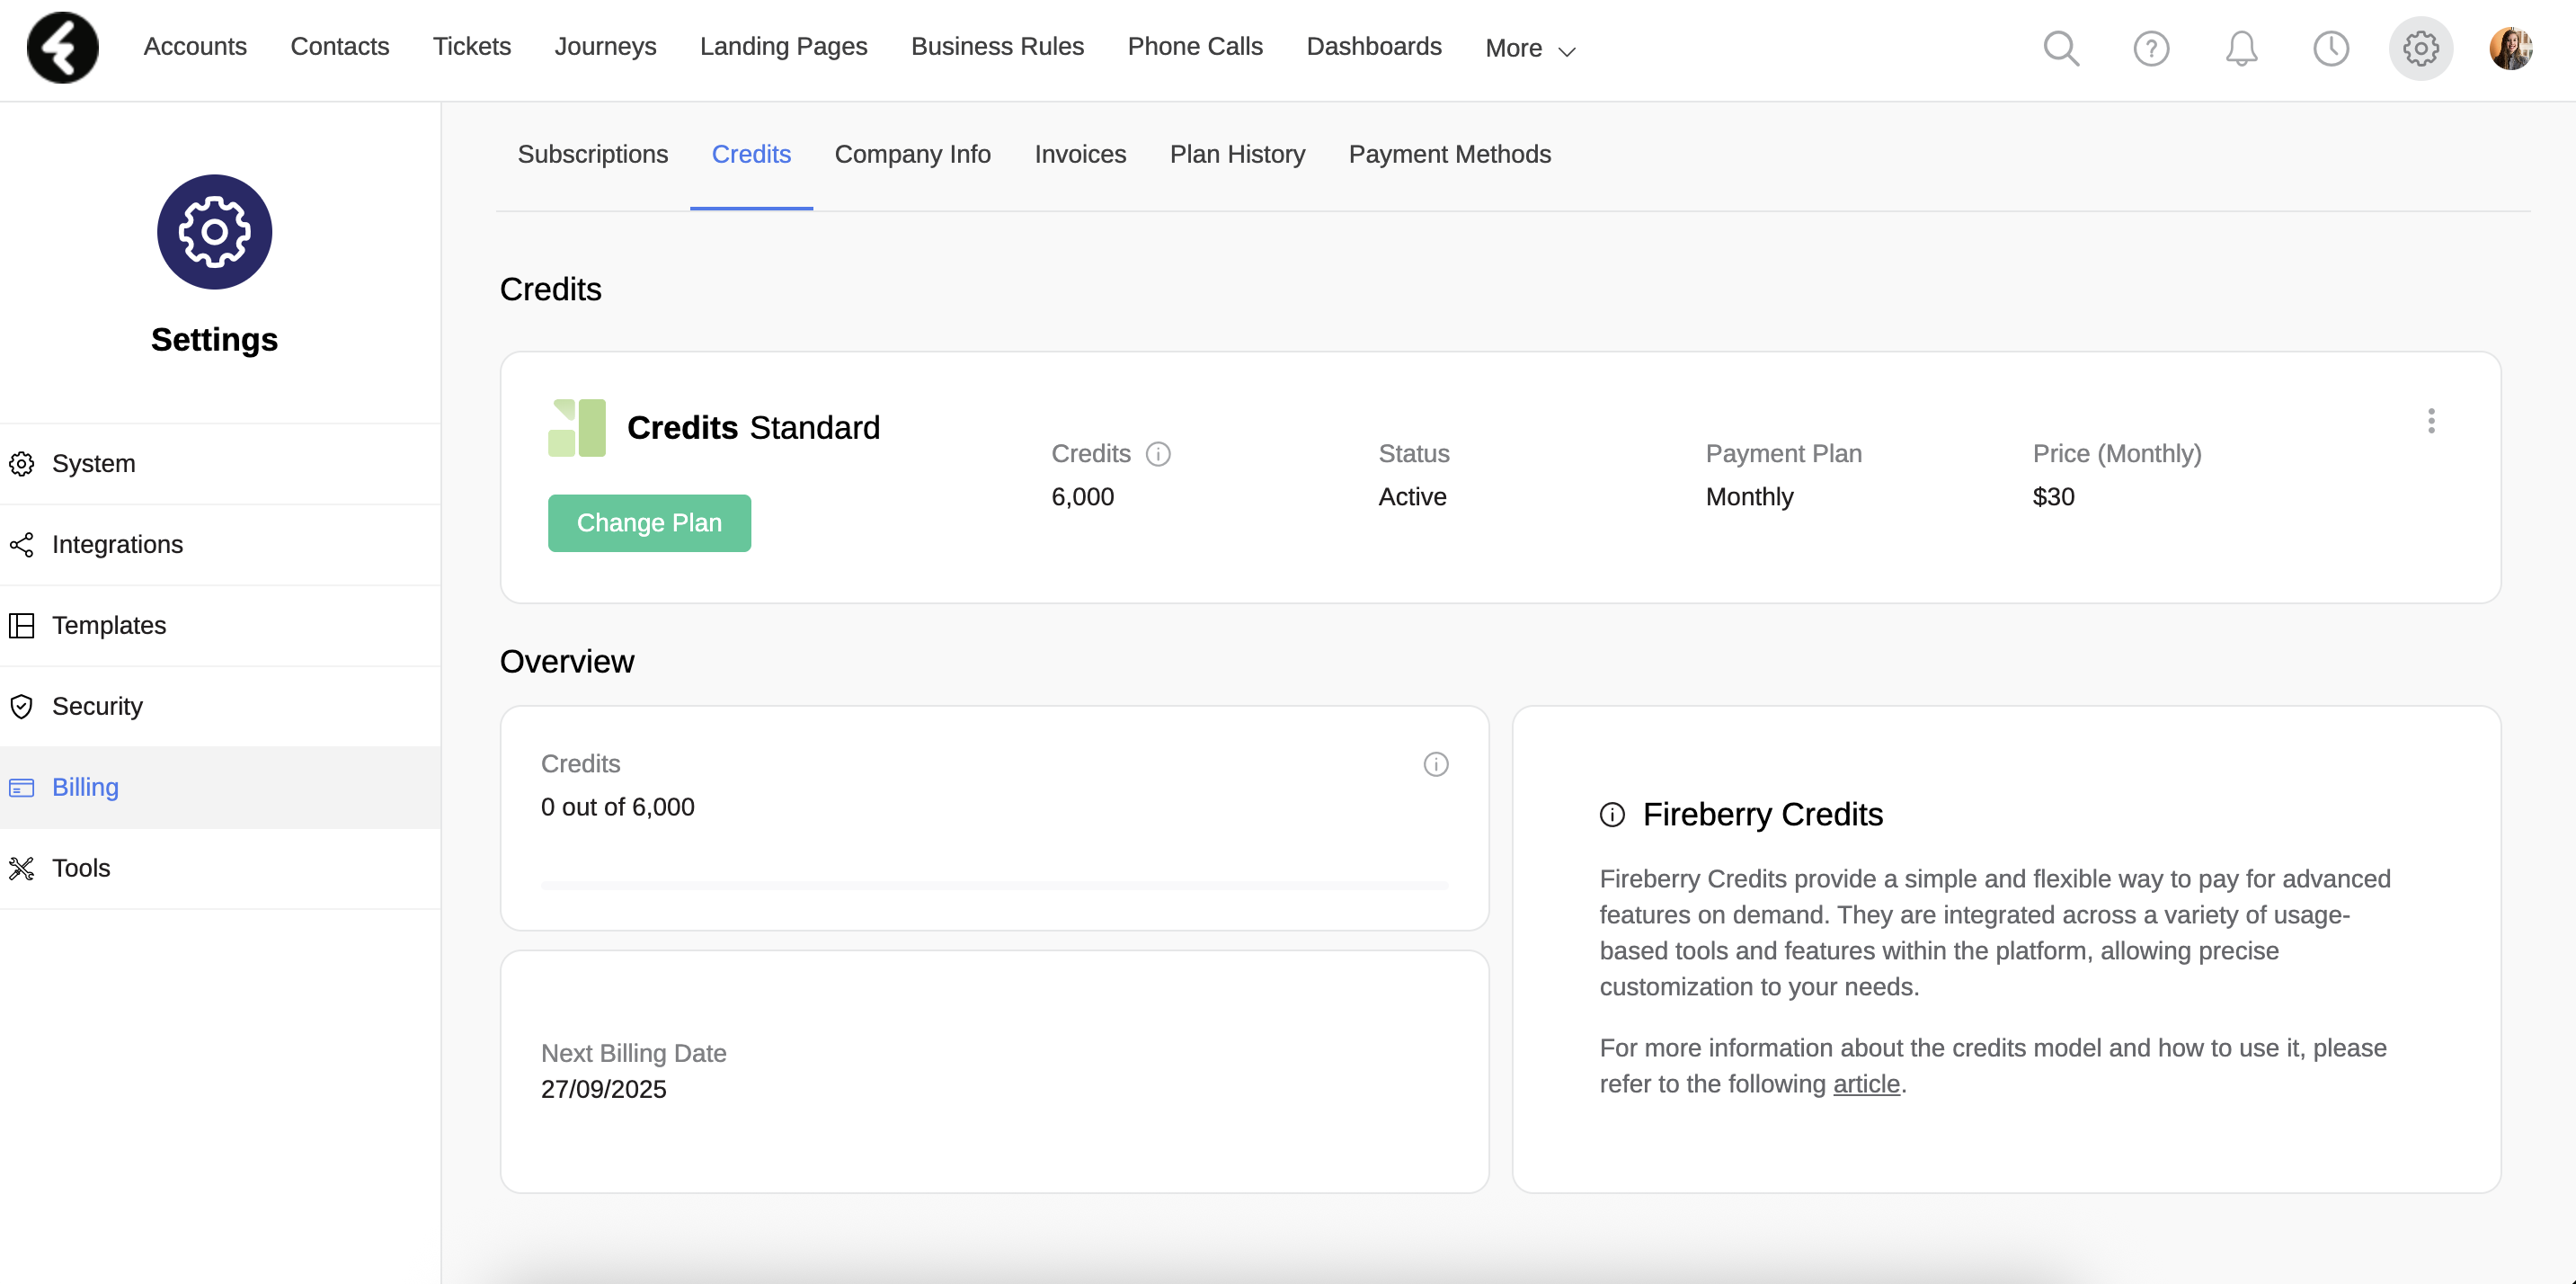
If you already have an active credits subscription, the Credits Page will display a row with your subscription details, such as monthly credits, subscription status, billing type (monthly/annual), and price. To learn more about the available subscription types-payment plans and license types, refer to the following article.
Unlike customers without a credit subscription, if a customer with an active subscription exceeds their purchased credit amount, they will automatically be moved to the next tier within the same billing cycle. This automatic upgrade is designed to prevent failures in automated processes defined in the system.
In the following monthly billing cycle, you will return to the credit amount originally committed to at purchase. However, if this overage occurs repeatedly across multiple months, it is recommended to upgrade your subscription to a higher credit amount to avoid additional costs.
Each subscription plan has different upgrade costs. In other words, the higher the plan, the lower the cost per extra credit, and vice versa. Credit tiers increase in steps of 1,000 credits. For example, if you purchased a plan with 2,000 credits, and in the same billing cycle you reach 2,001 credits, you will automatically be moved to the 2,000–3,000 credit tier. In the next billing cycle, if no additional overage occurs, you will not be charged.
Using Credits for Sending WhatsApp Messages
In the system, you can send WhatsApp messages through Streams, Automations, and Customer Journeys. Sending WhatsApp messages from within Fireberry requires the use of credits. The conversion rate is 4 credits per WhatsApp message sent through the system. This means that once you send a WhatsApp message from Fireberry, 4 credits will be deducted from your available credit balance.
Using Credits for Performing AI Actions
In the system, you can perform AI actions within Customer Journeys. Executing AI actions in Fireberry requires the use of credits. The conversion rate is 2 credits per AI action performed through the system. This means that once you execute an AI action from within Fireberry, 2 credits will be deducted from your available credit balance.
Changing Subscription Plans and Canceling Subscriptions
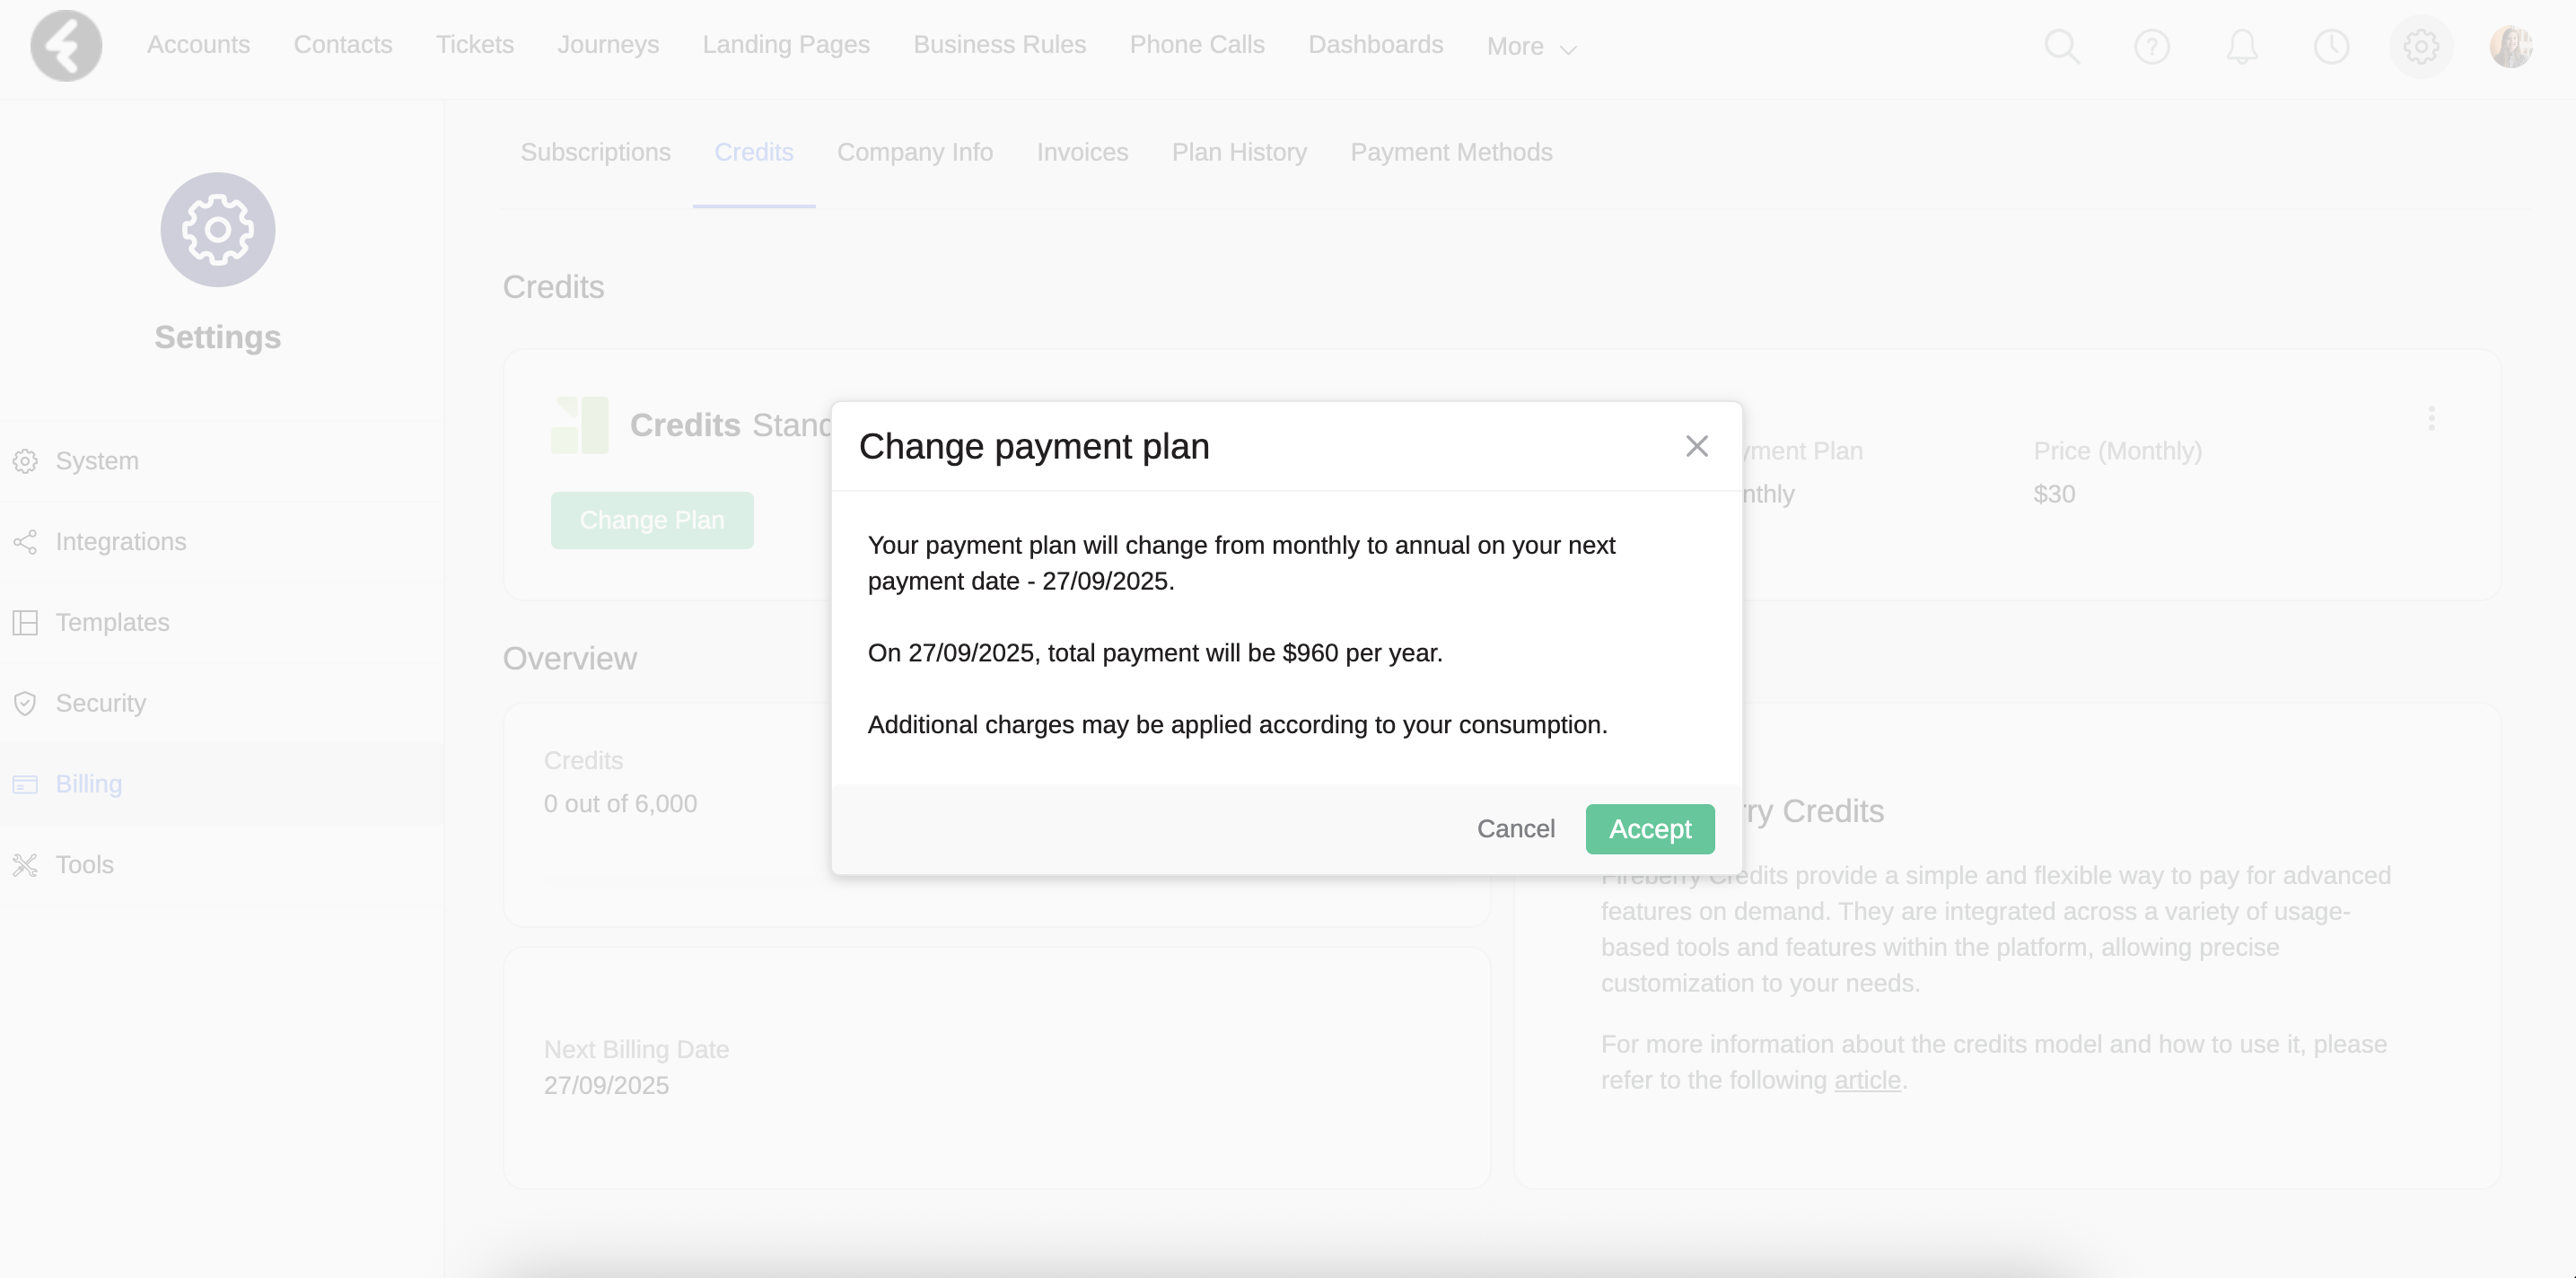
You can change your subscription plan at any time—for example, switch from a monthly plan to an annual plan, or vice versa. To make this change, click the three-dot menu in the subscription row and select Switch to Monthly/Annual Plan. A window will appear summarizing the change and the date it will take effect. For example, if you are currently committed to an annual plan, the change will only take effect at the end of your annual commitment period, at which point you will be switched to a monthly plan.
Once you confirm the change, an orange banner will appear under your subscription row, notifying you that the change request has been received and displaying the date it will take effect. At any time, you can cancel the request by clicking the button again.
Additionally, you may cancel your subscription at any time. To cancel, click the three-dot menu in the subscription row and select Cancel Subscription. A window will open asking you to provide a reason for the cancellation. After confirming, the window will close, and a red banner will appear under your subscription row confirming that your cancellation request has been received. The cancellation itself will take effect at the end of your commitment period. As with plan changes, you can also reverse your decision at any time by clicking the button.
To learn more about subscription cancellation, refer to the following article.