How to use Team Inbox
By connecting your system to a team inbox, you can easily manage emails to and from customers, suppliers, users, and everyone in between. You’ll also keep all your emails in one place, so you can work out of one centralized system. Each email will be automatically saved in the relevant record, and your team will be able to read over and even take over correspondence without missing any information. To learn how to set up a team inbox in the system, click here. Below you’ll find explanations on how to use the team inbox feature once it’s set up in your system.
Sending new emails
To send a new email, first open the record you’d like the email to be related to, which will ensure that the new email will appear in the record’s stream. Then click the Email option from the stream, which you can learn about here. This will open a pop up email on the right of your page, where you can build and then send your email.

From
The From field lets you set which attached team email to send the current email from, and is automatically filled in with the email most recently connected to your team inbox. If you have multiple emails connected, you can switch the selected sender by clicking on the currently selected email and then choosing a different team email from the list. Only attached team inbox email addresses will be displayed. You can learn how to add team inbox addresses here.
To
The To field sets who the email will be sent to. If you’ve created your email from an Account or Contact record, and there is an email address filled out in the Email field (API name: emailaddress1), the To field will automatically fill in this email address. Email addresses which are found in one of the built in email fields, listed below, in any account or contact record will be displayed as the name of the account or contact. Hovering over the name will display the email address.
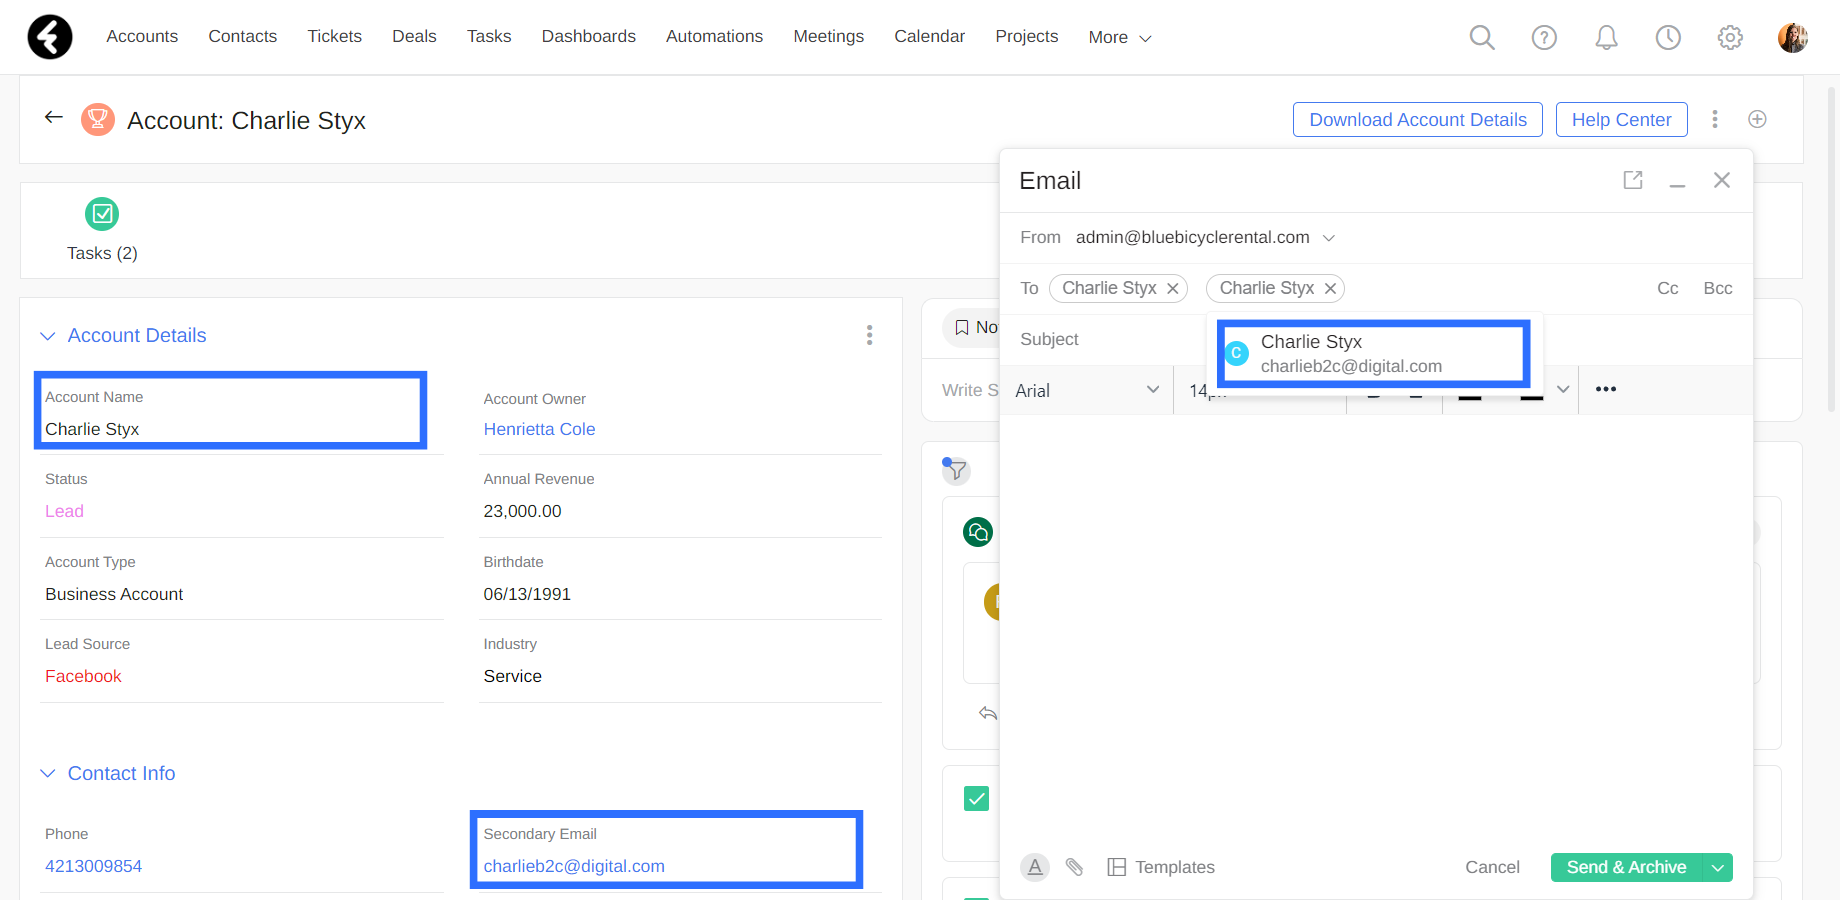
You can remove any email address by clicking the X on its right. To add new email addresses, simply click inside the To box and then type. You can either add an email manually by clicking Enter after typing, or automatically search for an email by typing.
The search results will show any email addresses which are found in any of the built in email fields of any Account or Contact records.You can also search for the name of an account or contact. This will display all the email addresses in the built in email fields which belong to the searched for name. For example, searching for “alex” will display any email addresses which start with alex, as well as all the email addresses which belong to any accounts or contacts whose names start with alex, such as both Alex Brite and Alexa Green. Click on a search result to add the selected email address as a recipient.
CC and BCC
The Carbon Copy (CC) and Blind Carbon Copy (BCC) fields work similarly to the To field, except that they will not fill in automatically. Like in any email interface, CC will send a copy of the email to another recipient where all recipients can see that a copy was sent. BCC will also send a copy, but no other recipients will see that a copy was sent.
Subject
Click the Subject line and then type in the subject of your email. When using the template option, which is explained below, the current subject will be erased and replaced by the subject of the template.
Body
The Body of your email can be completely customized using the format bar, which works very similarly to the HTML field options that are explained here. There are slight differences between the two. You can choose to display or hide the format bar using the A icon on the bottom left of the email. Next to this icon you’ll find a paperclip, which you can click on to select files from your computer and add them to your email. You’ll see these files appear at the bottom of your email, along with individual progress bars informing you of their upload status. There is a 25 MB limit per email. You can also choose to use templates, which are explained in detail below.

Send email
Once your email is ready, be sure to click the green Send & Archive button on the bottom right. This will send your email to the set recipients, save it to the stream of the current record, and set its status to Closed. If you’d like to set the email’s status to Open instead, you can click the down arrow next to the Send & Archive button and then select the Send option. Learn more about email statuses below. You can also use the Cancel button at any time to delete your email.
More options
At the top right of your email you’ll find three options. The first is an expansion icon, which you can click on to expand your email to full screen mode. The second is the dash icon, which you can click on to minimize your email into a tab at the bottom of the screen. Clicking the minimize option in full screen mode or from a minimized tab will return your email to the default state. The third is the X icon, which can be clicked on from any email display to delete the drafted email. Once an email has been deleted, you won’t be able to recover it and will need to rewrite your email.
Existing emails
Once you send an email, it will be saved in the stream of the record the email was opened from. Incoming and synced emails may also appear in your stream, if the email address in the From field of the email matches any of the emails found in any of the email fields in an account or contact record. You can find more details on when and how email records are related below.
Viewing emails
To see all the emails attached to a record, open the object the record is in, such as Accounts, then open the relevant record. On the right of your page you’ll find the stream, which you can learn about here, and emails within it. If you don’t see any emails, you either don’t have emails attached to the current record, you need to scroll further down in your stream, your stream filter, which you can learn about here, is not displaying emails, or you don’t have the proper permissions, which are explained below.
Emails will be displayed in reverse chronological order, so that the most recent emails will appear first. Any emails with the Open status will be shown at the top of the list. Each email will be shown as a preview, and clicking on it will show the entire email, including the receiving email and the full text. You can click on the sender of the email to copy their email address. To return an email to preview mode, click on it again. The preview will show the sender of the email, followed by the time the email was sent.
Replies to emails will be attached as threads to the original email, and only the most recent email will be displayed in the email preview. To view all the emails in the thread, click the Show All button on the bottom right. It will be followed by parentheses with the total number of emails in the thread. Once all the emails are displayed, the text will change to Show Less, which you can click to return the email to the preview display.
Assigned user
At the top right of each email thread, you’ll find the name of a system user. You can use this field to assign the email to the system user in charge of it. This field will automatically fill in with the owner of the record attached to the email for any incoming emails. For example, if an incoming email is attached to an account, and Mark Waisman is the account owner, then the email will automatically be assigned to him. Outgoing emails will be automatically assigned to the user who sent the email. You can easily change the assigned user by clicking on the current user, and then searching for and selecting a new user.
Status
To the right of the assigned user you’ll find a bubble which either says Open or Closed. This is the status of an email, and will default to Open for incoming emails, Closed for outgoing emails which use the Send & Archive button, and Open for outgoing emails which use the Send option. Learn about the Send options above. Emails which are marked as Open will appear at the top of the stream. You can easily change the status of an email by clicking on its current status and selecting a new one. As soon as an email which is set to Open is replied to through the system, the email will be reset to Closed.
Email actions
Once you move an email out of preview mode by clicking on it, three email actions will appear immediately under the displayed To and From fields. Each option is displayed as the relevant icon, but you can hover over them for the name.
- Reply: Send a response only to the original sender of the current email. Will add Re: to the front of the subject line.
- Reply All: Send a response both to the original sender and to all the other recipients who were in the To and CC fields. Will add Re: to the front of the subject line.
- Forward: Send the email on to someone else.You’ll need to fill out the To field for this option.
You can use these options to reply to a specific email in a thread, or click on the same options at the bottom of the thread to reply or forward the entire thread. After selecting one of these options, a small editor will appear immediately under your email. You can choose to write, edit, and send your email from here, or you can click the expansion icon on the top right to open the full email editor. Above you can learn about all the different email fields to fill out. The Reply and Reply All emails will include all the previous emails in the thread, but you will not see these emails when editing your email. The Forward option will also send the email thread, and will include the email thread in the body section of the email that you can edit.
Using your inbox
In addition to viewing emails through streams, you can also use the Inbox object, which will let you view all the emails in your system. Select Inbox from the top bar menu, or search for it using the More option on the far right. Here you’ll find three default views. The first is All Mail and will show any email records within the system. The second is Archives and will display any emails where the status field, which you can learn about above, is closed. The third is the Inbox view, which displays any emails with the open status. This is a great way to check if there’s any emails in your system which have not been answered yet. Clicking on an email will open the email in its attached record, which you can learn how to interact with above. Each email record in the Inbox object represents an entire email thread. The subject and message displayed in the record will be from the most recent email.
Relating emails
Email records will appear in the stream of any system records they’re related to. Emails can be related to more than one record at once, using the lookup fields described below. By doing this, you can have an email thread appear in the relevant account record, the specific contact record who’s been in touch, and even a ticket or deal. Your email thread will then be easily accessible in every place where it’s relevant in the system.
Any email which is created directly from a record’s stream, which you can learn how to do above, will be automatically related to the record it was created within. For example, if you create a new email from the “Ben Waxler” contact record, the email will be related to the Ben Waxler contact record and appear in its stream.
Additionally, received and synced emails where the From field email address matches the email address of any email field in an account or contact will automatically be connected to the relevant account or contact record.
Email lookup fields
Each email will use one of the following three lookup fields, which you can learn about here, to relate an email to a record. All three fields can be found in the Inbox object. The API names, which are written in parenthesis, can help you identify these fields even if their names have been changed. While each field may fill in automatically, you can also choose to set them manually from the Inbox object using the list view, explained here.
- Account (accountid): When creating an email directly from an account record, this field will automatically fill in with the account. Additionally, this field will automatically fill in for any emails which were received and synced to the system where the email address used in the From field of the email matches the email found in any email fields within an account.
- Contact (contactid): When creating an email directly from a contact record, this field will automatically fill in with the contact. Additionally, this field will automatically fill in for any emails which were synced to the system where the email address used in the From field of the email matches the email found in any of the email fields within a contact.
- Related To (objectid): When creating an email directly from any record which does not belong to the Account or Contact objects, this field will fill in. For example, you can send a ticket to a customer and relate the email record to the specific ticket record you’re replying to, in addition to relating the email to the relevant account. If you choose to set this field from the Inbox views, you’ll find a searchable dropdown list to the right of the search bar where you’ll be able to select an object before selecting a record to relate. You can learn more about the Related To field here.

Templates
You can use the templates option at the bottom of an email to easily insert the Subject and Body into an email. This is great for cases where the same email is frequently sent to customers, such as a check in email or a reminder for a meeting. To use a template, simply click the Templates button on the bottom of the email and then search for and select one of the template options.
If you don’t have any templates, or none of them are relevant, you can select the Manage Templates option at the bottom of the list. This will open the Snippets object, which you can use to add new email templates or edit existing ones.
You can click the Add button on the right to add a new snippet. Set the Snippet Name field to the subject for your email and the Content field to the body of your email. Once you Save your new snippet, you’ll find it in the templates list of any email and can start using it. To edit an existing snippet, simply click on the snippet record you’d like to edit to open its page and then edit any field.
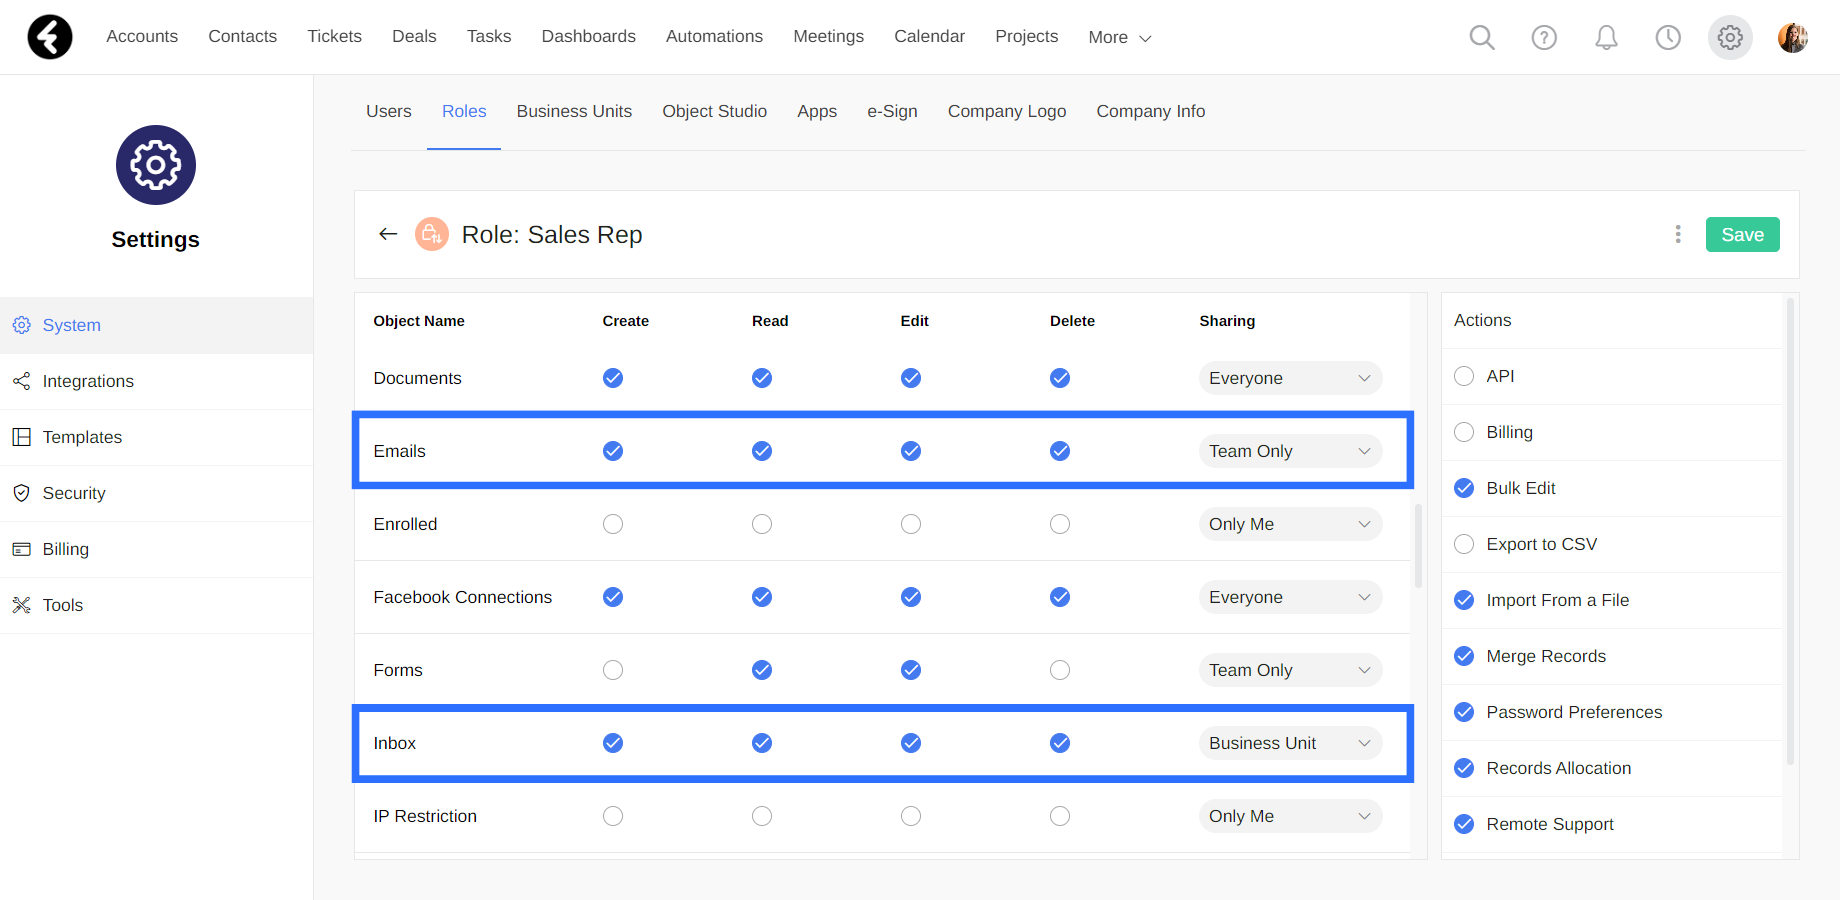
Team Inbox permissions
Role permissions control when each system user will have access to records and actions, and is explained here. Users need permissions for the following objects in order to access and send team inbox emails.
- Team Inbox: Users need the Read permission in order to view any team inbox emails. Additionally, the sharing settings set for this object will control which email addresses users have access to. The owner of each email address is the system user who created the integration. For example, if the sharing setting is set to Team Only, and the user who created the team inbox integration is not on your team, you will not have access to this team inbox email address. This means you will not be able to send emails from this address.
- Emails: Users need the Create and Read permissions in order to view and send emails.
- Inbox: Users need the Create and Read permissions to view and send emails. Enabling the Edit option here will let users change the status of emails, assign system users, and more. The Delete permission on this object will let users delete emails. The sharing settings here will control which emails users have access to.