How to import an Excel file
You can import all different types of data into your system. This is a great way to import your existing data and update any existing records with new information.
Access the import tool
To start the import process, you’ll need to open the import tool. First click on the gear icon on the top right of the page to open the system settings. Then select the Tools tab on the left; This will open up the Import page by default. Here you can click on the green Import button under the Import Data heading. You can then choose the file for import, which you can learn about below.
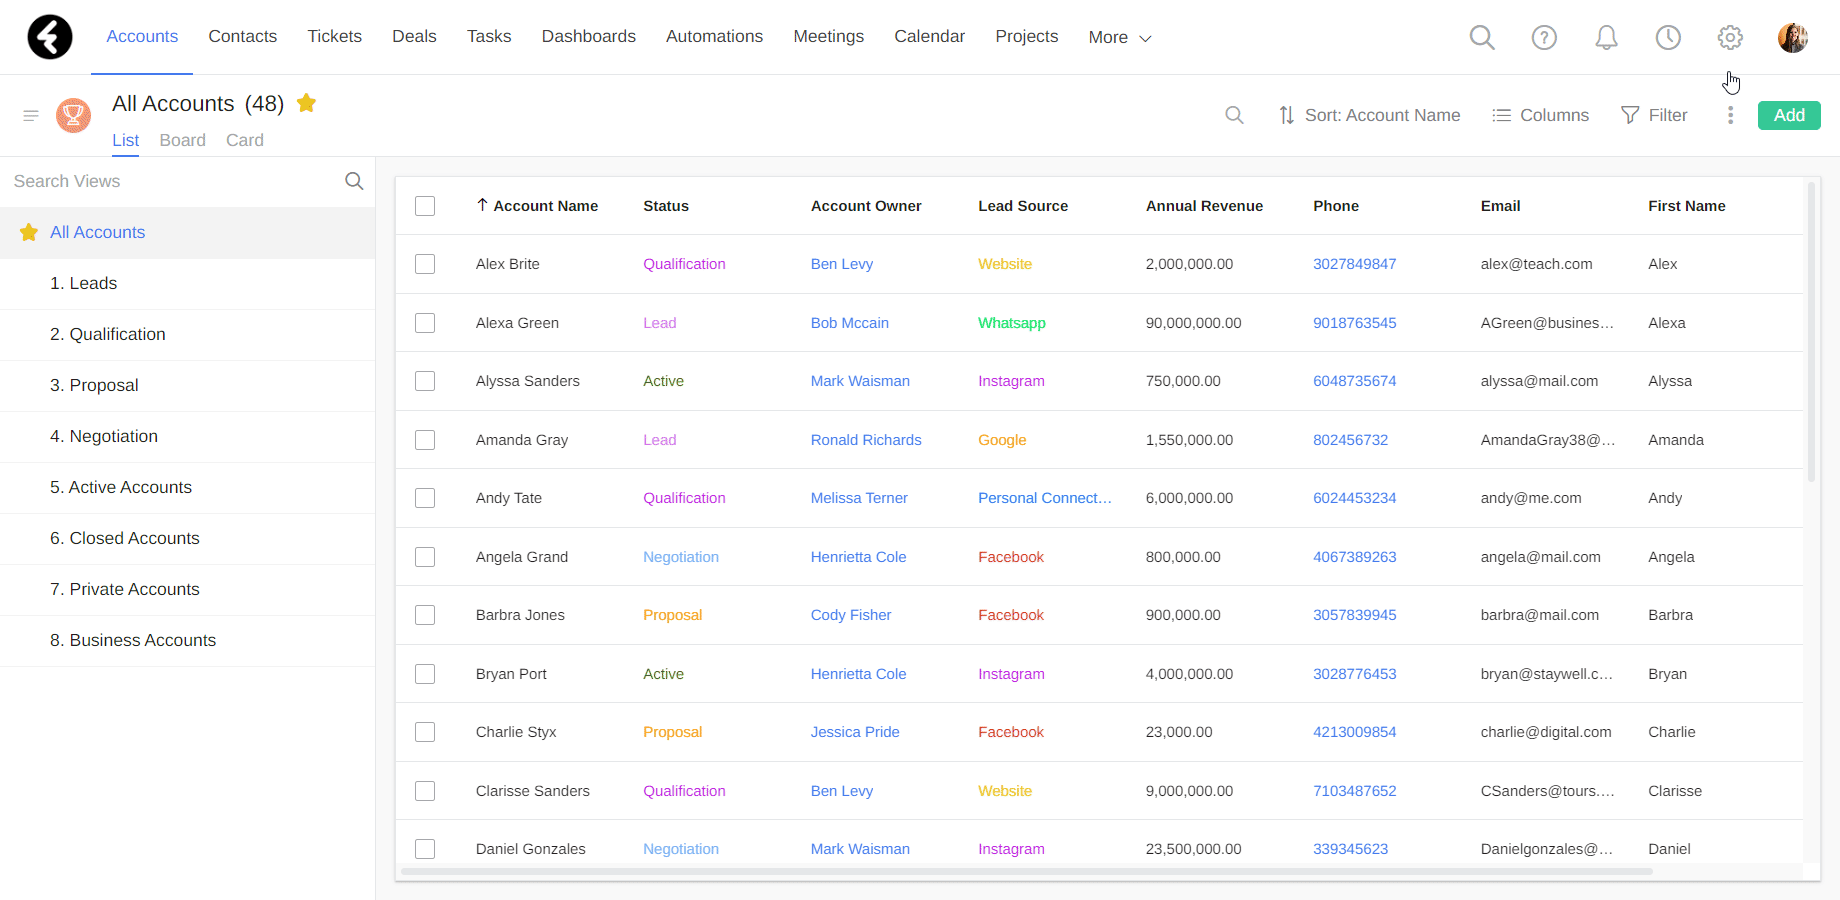
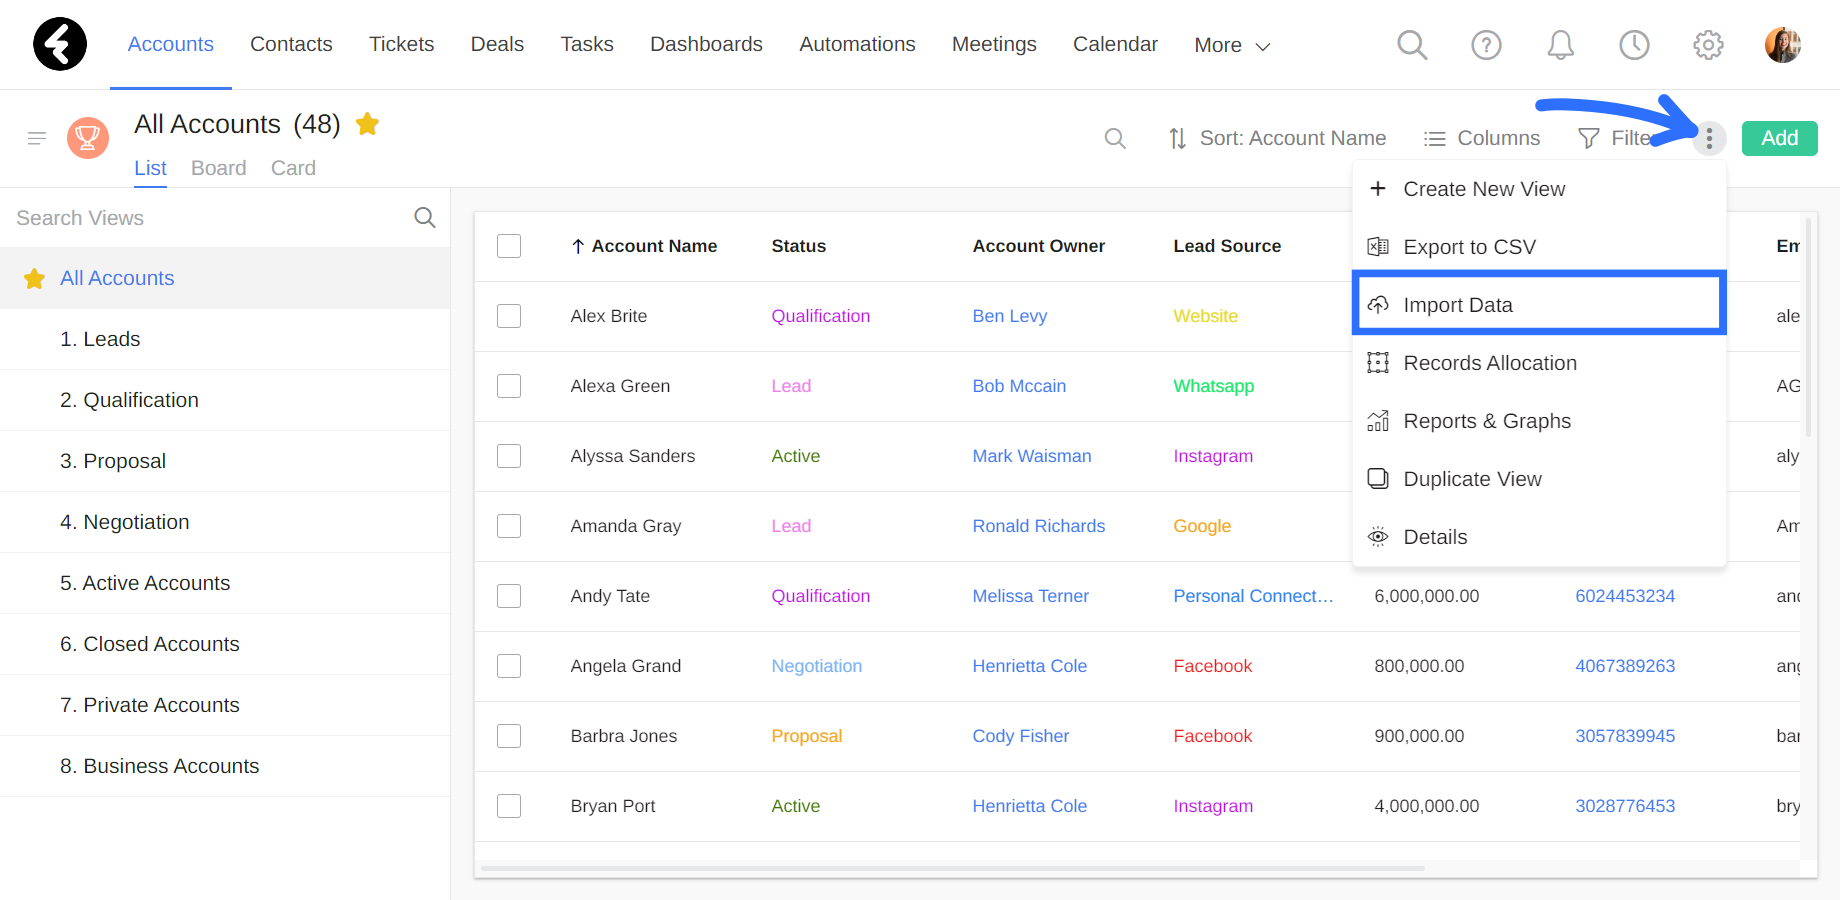
You can also choose to open the import tool directly from the Accounts or Contacts views. To do so, simply click the three dot icon on the top right of the view and then select Import Data. This will bring you to the import tool, where you can click the green Import button to begin.
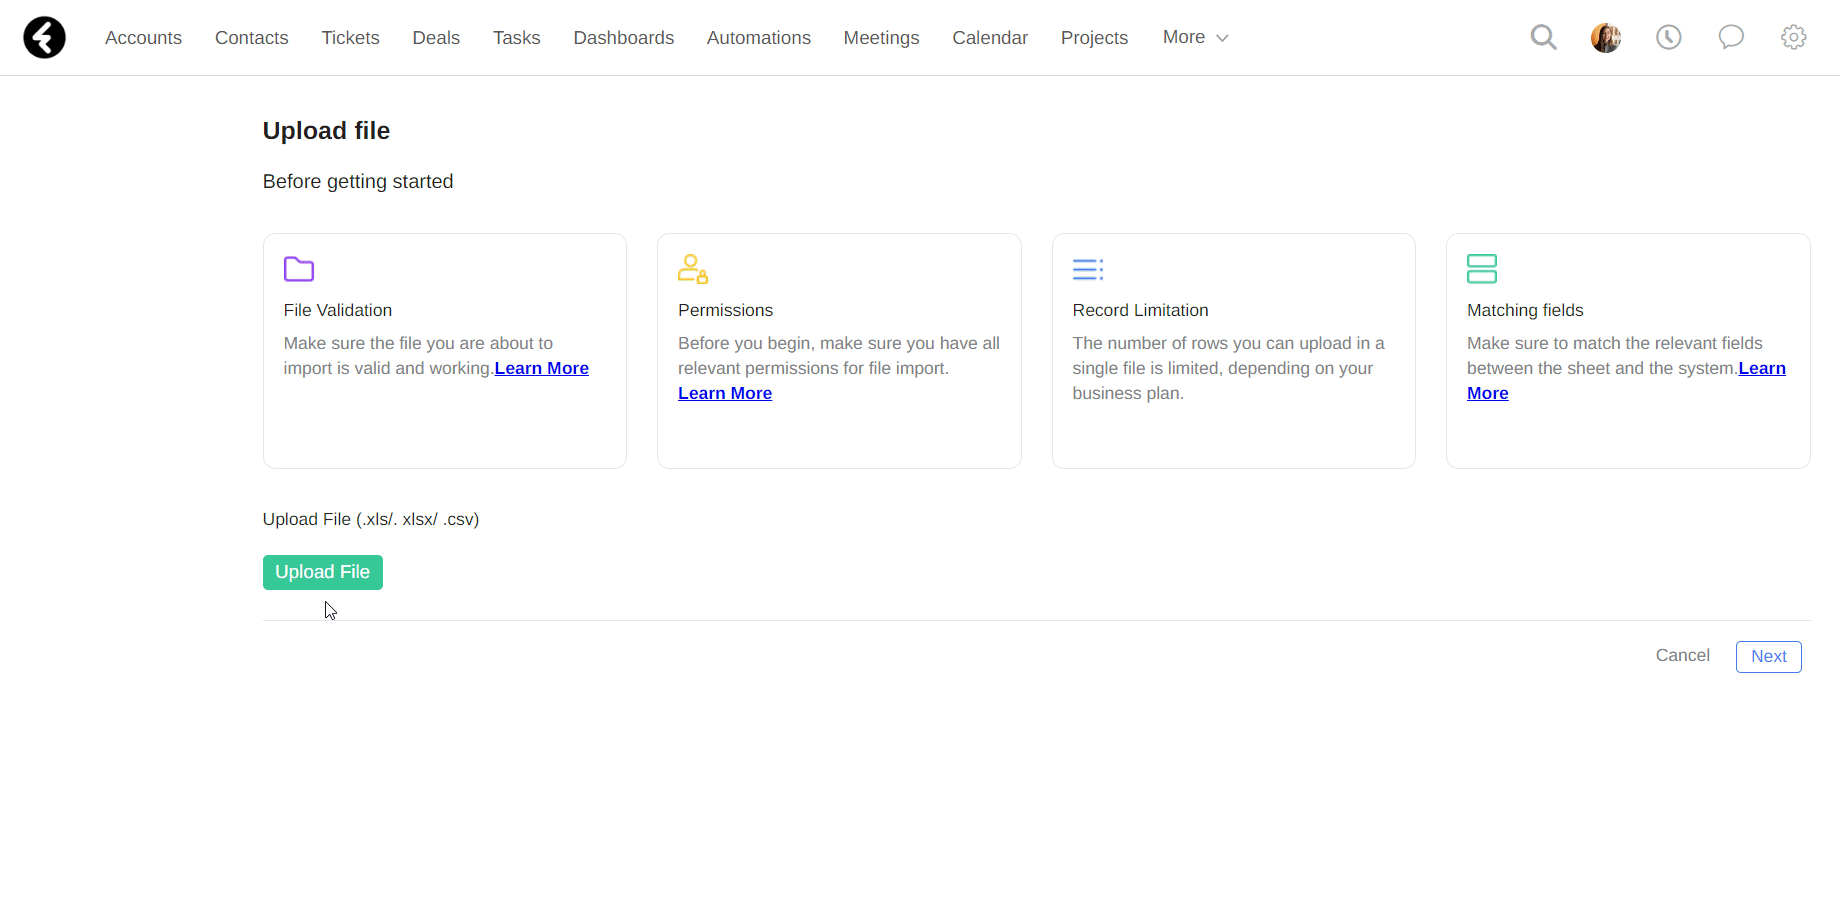
Upload a file
Once you’ve opened the import tool, the first step is uploading a CSV or Excel file. For details on how to set up and format your excel file, click here. Next make sure your file is the right type by checking that it ends with .xls, .xlsx, or .csv. You can then click the green Upload File button to open up the documents on your computer. Select the file you’d like to import, and then click Open on the bottom right of the documents window. If your file is not the correct type, you will receive an error and can try again. You’ll only be able to import one file at a time. After uploading your file, the file name will appear in blue in place of the Upload File button. You can then click Next to move on to the next step, or click Cancel to delete the current file and upload a new one.
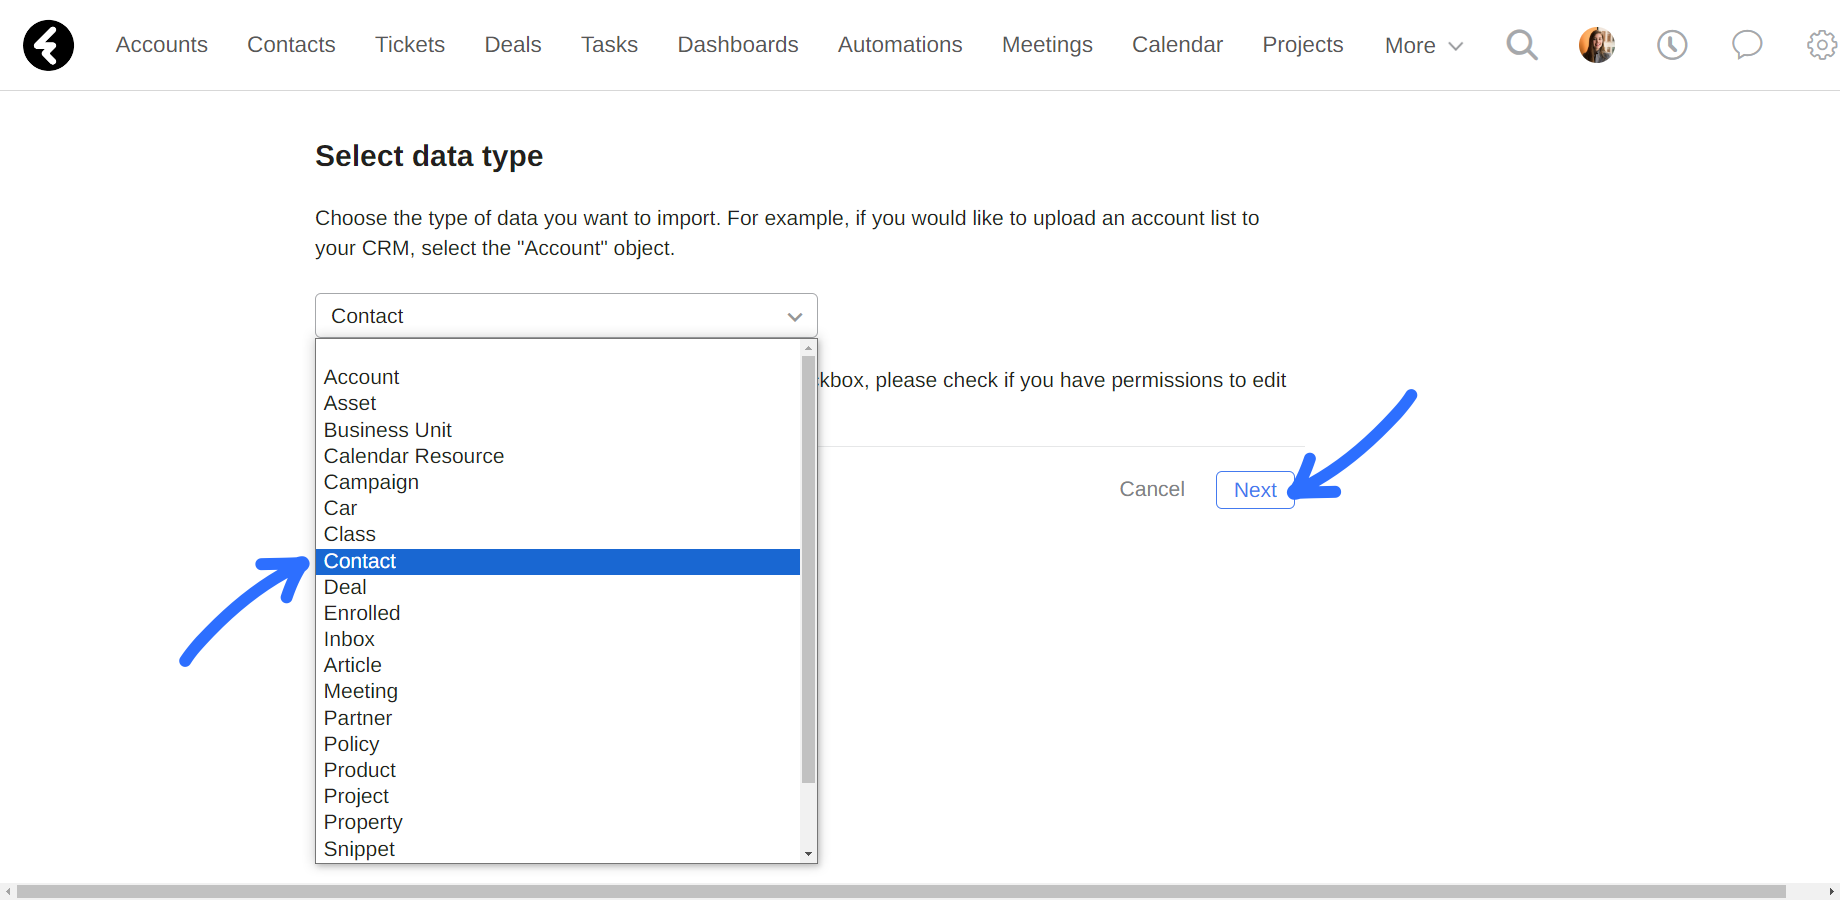
Select a data type
Now that you’ve uploaded a file, you can choose where to upload the data to. You’ll need to select the object which you’d like to add records to or update existing records within. For example, if your file contains new contacts which you’d like to add to the system, select the Contacts object. To choose the relevant object, simply click on the empty box. This will open a searchable dropdown list of editable system objects. You can now click on an object to select it. After selecting an object, you can click the Next button to move on to the next step. To switch the selected object, simply click on it to reopen the dropdown list and select a new object. You can click Cancel at any time to return to the previous step, uploading a file, which is explained above.
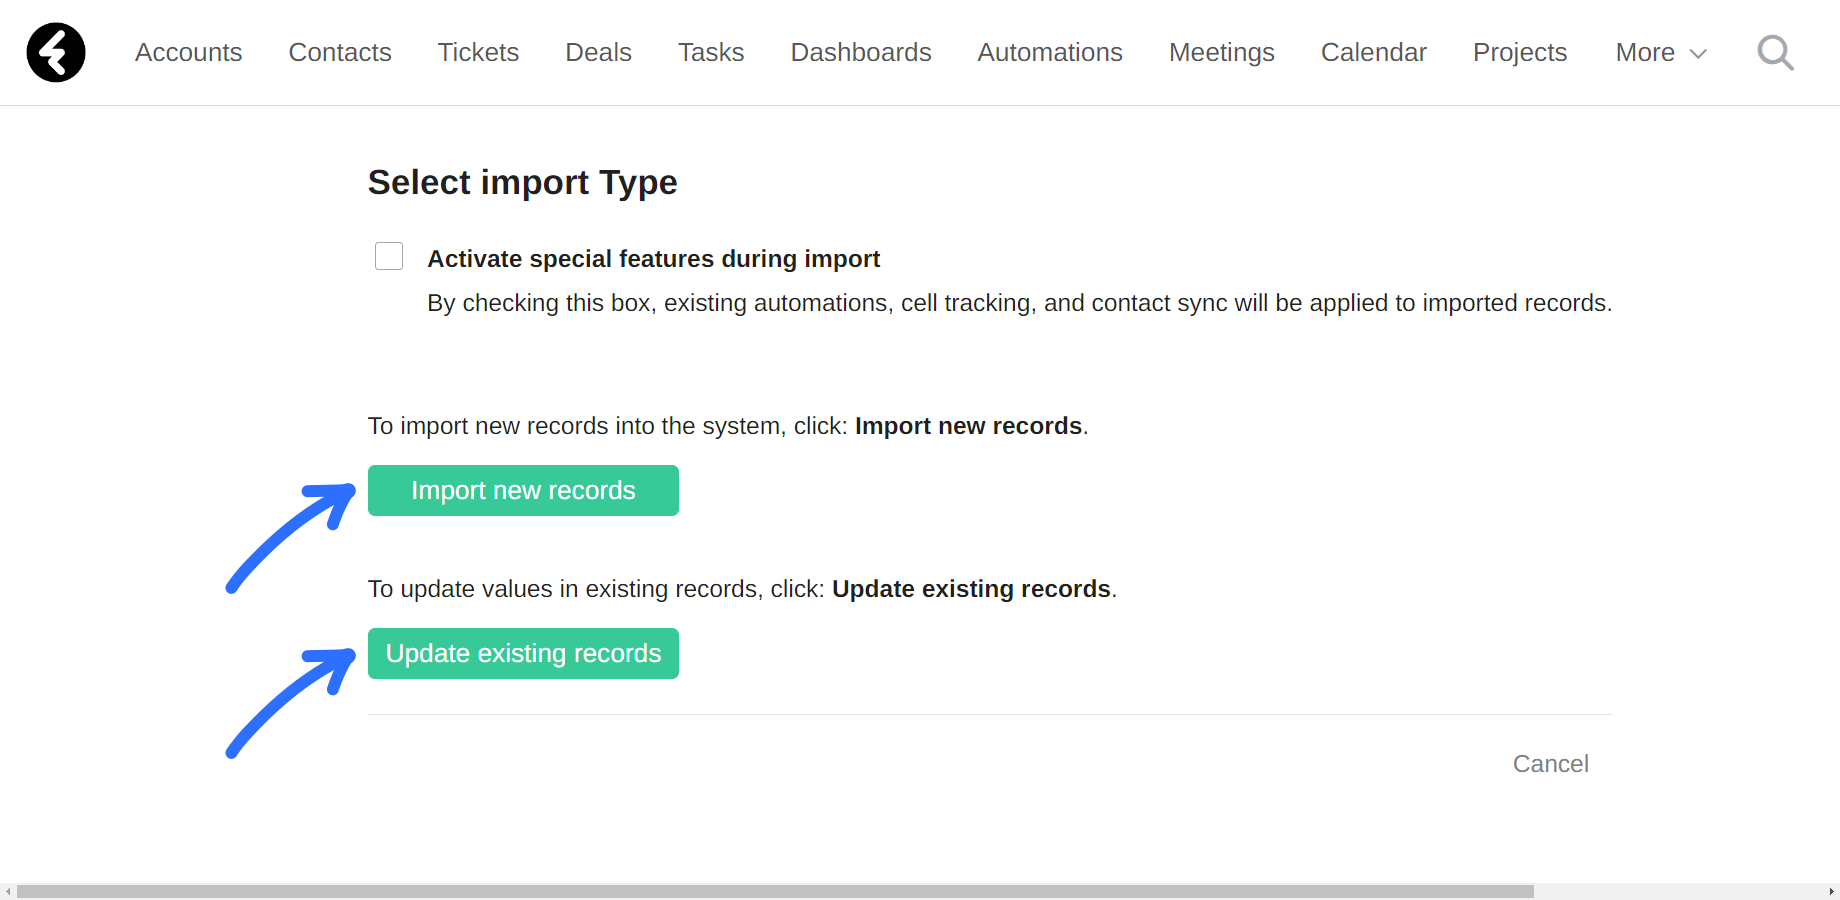
Select an import type
Now that you’ve chosen which object type your new data belongs to, you can select if you’d like to import new records to the selected object or update existing records within the object.
Activate special features
Before selecting an import type, choose if you’d like to check the Activate special feature during import checkbox. Checking this box will activate automations, field tracked changes, and syncing both contacts and meetings with your Google or Office365 account. For example, If you do not select this box and you have a welcome email automation which is sent to all newly created accounts, accounts which are created via this import will not receive the email. If you’re not sure if there are active automations you may activate, or don’t want users to receive notifications based on changes made through your import, you can choose not to activate special features.

If you choose not to select this box, the following things will be affected:
- No automations will run for the new or updated records. Click here for an article explaining automations.
- The Track Changes feature, which you can learn about here, will not run. This means that the system will not save that a field has been changed, and notifications will not be sent to the record owner.
- The Follow option for existing records will not send notifications to any users who have activated it.
- Summary fields using the Number of records option will not count newly added or updated records. The changes will be processed once a new record is added to the summarized object or when the lookup field within the summarized object is updated in one of the records. To learn about summary fields, click here.
- Summary fields using the Minimum, Maximum, or Sum options will not be updated. Once any one of the fields which is being summarized is updated, the summary field will be updated. To learn about summary fields, click here.
- Formula fields which use summary fields will not update until the relevant summary field is updated. To learn about formula fields, click here.
- Calendar meetings and contacts will not be synced with the new or updated data. You can sync the new information by updating any field in each newly imported record. To learn about syncing data, click here.
Import type
The Import new records button adds new records into the system, and will be displayed as long as you have Create permissions for the selected object. The Update existing records button will find and then update data within existing records, and will be displayed as long as you have Update permissions for the selected object. Click on the relevant green button to move to the next step, or click Cancel on the bottom right at any time to restart the import process.
Match the fields
Once you’ve chosen whether to import new records or update existing ones, you can set up where each column in your file will be imported to. This is done by matching the columns in your file to the system fields in the selected object.
You’ll find a table on the Matching fields page which contains two columns, File titles and Software fields. Under the file titles you’ll find the values from each column in the first row of your excel/csv table automatically filled in. If you’ve set your first row as titles, you’ll see these titles. If not, you’ll simply see whichever data appears in your first row.
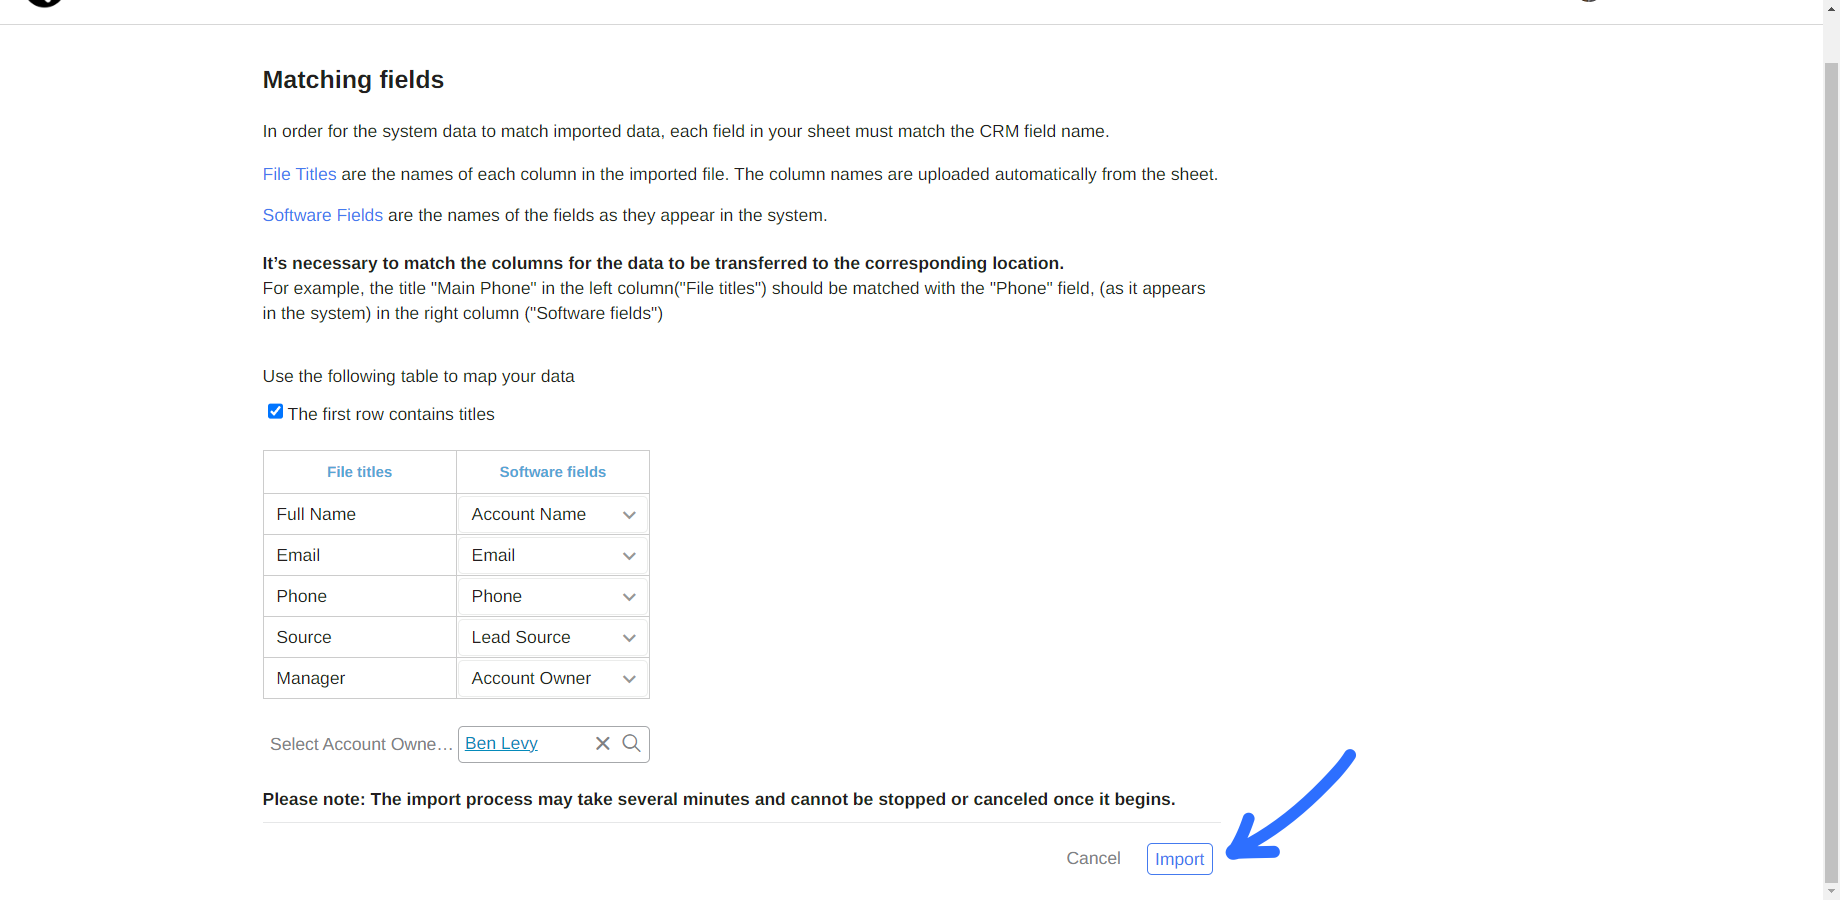
Under the software fields column, each row will contain a searchable dropdown list of all the fields within the object selected under Select data type above. For each file title, you can select the field where this data will be imported into. For example, if you’ve selected the Account object, you can choose to set a Full Name column from your file to import into the field Account Name.
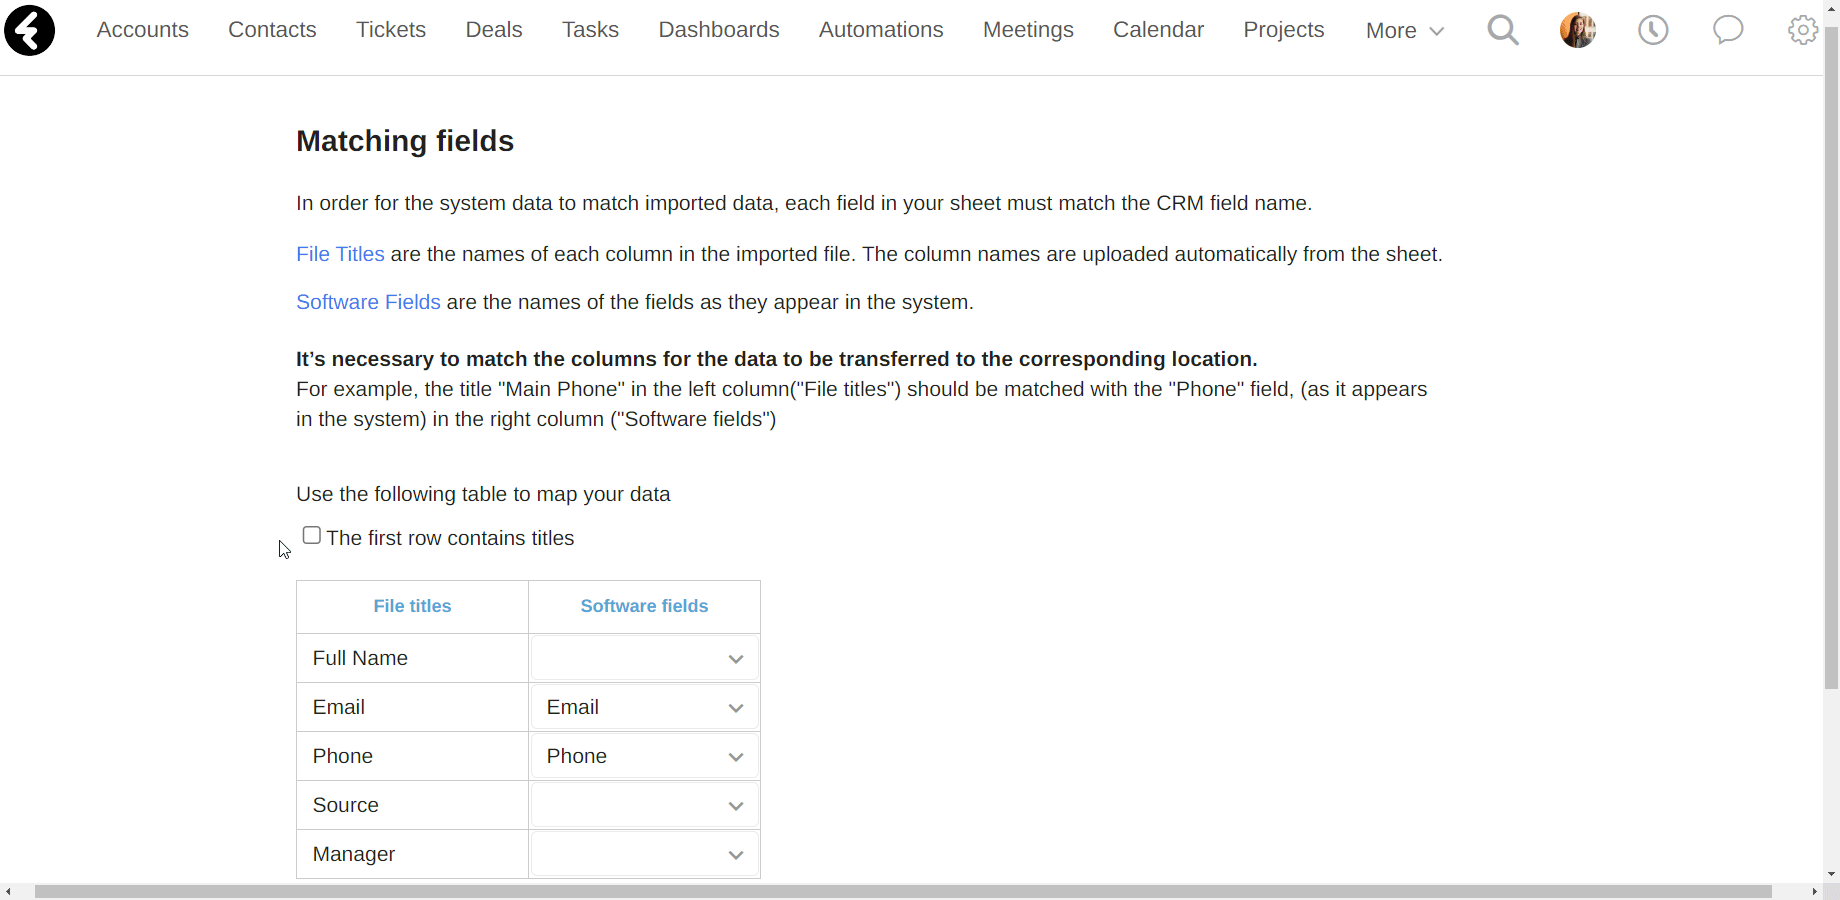
Any columns in your file which have the same name as a field in the system will automatically fill in the software fields column with the relevant field. You can easily change this field to any field you’d like by clicking on it and selecting a new one. For example, if the file title is Email, then the software field will automatically fill in as Email, provided that you have a field named Email in your Account object. You can choose to import the file column Email into the system field Secondary Email instead by simply changing the field selected in the software fields column.
Owner field for imports
When selecting the import new records option, you’ll find an extra field underneath the field matching table. This field allows you to set a default owner field. The owner field is a required field which sets the system user related to the record. The default value set here will be used if the owner field was not set as one of the fields in the Software fields column. In this case, all the imported records will have the owner set in the default field. To set the default owner, simply click the magnifying glass icon on the right of the box and then click on the desired system user. For example, if you’re importing leads you may wish to set the default owner as a sales team representative.

Sometimes the owner field is set as one of the Software fields, but a specific record did not import an owner. This could be because the value for the owner column was blank, or because the name of the owner was not found in the system. If the owner was not found in the system, it could be because the system user does not exist, or simply because the name wasn’t formatted in the file to exactly match the system name. To learn about file formatting, click here. In any of these cases, the current user who is processing the import will be set as the owner of the newly created record.
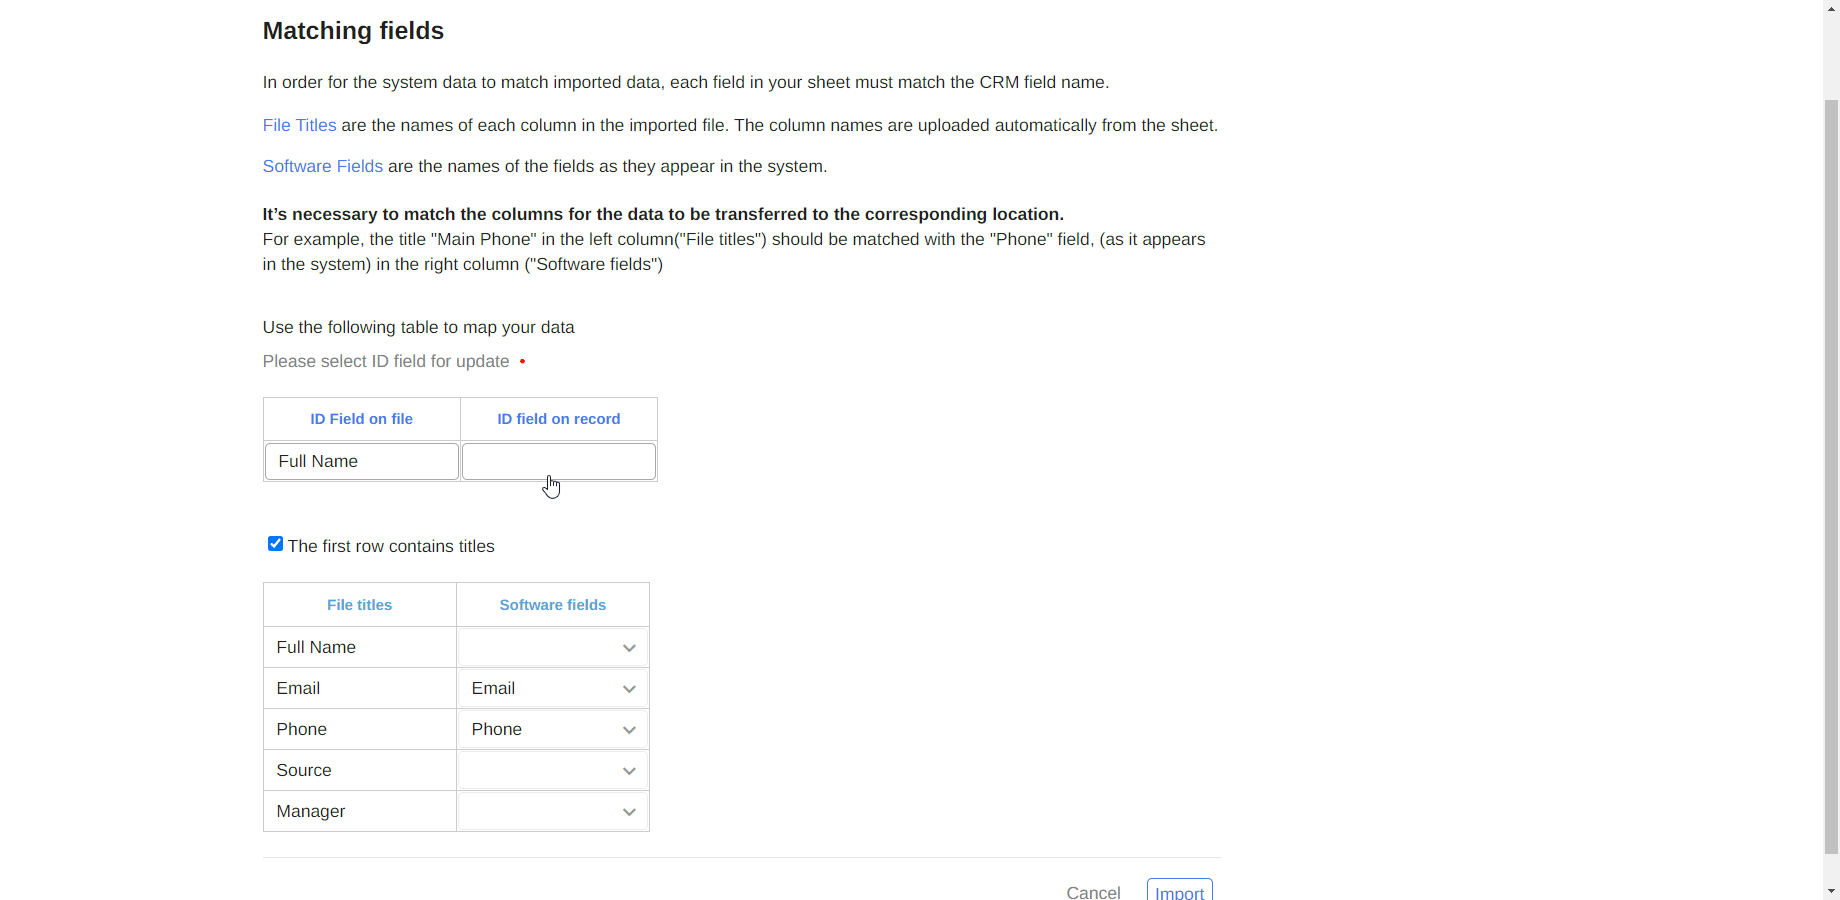
ID field for updates
When selecting the update existing records option, you’ll see a small table which appears above the field matching table. This table lets you set an ID field. This field will be used to match the records in your file with the system records, and must be identical in both the system field and the file. Try to select a field which only occurs once for each record, such as an ID number, phone number, or email. If the ID field exists in more than one record in the system, these records may be updated with the same information and thus have duplicate data. Once you’ve chosen which field you’d like to use as an ID, set the field for both the file and the system.
To set the ID field which will be used from your files, first click the box under ID Field on file. This will open a searchable dropdown list of the fields in your file, where you can select the relevant field. Next, under ID field on record, select the system field which you’d like to use. To the right of your table, you’ll see either a green check or a red X and a message. The green check means that the system field you’ve selected does not appear in more than one record. If the X appears, there are multiple records which share the same value under the selected field. You can then switch the selected field to a field with a green check, otherwise duplicate information will be created in your system.
Once you’ve finished matching all your fields, be sure to set either the default owner field or the ID field. Then click the Import button on the bottom right. This will start the import process, which may take a few minutes and cannot be stopped after it begins.
A line will be added to the import log, which you can learn about below, where you can track the import’s progress. If you receive an error throughout the import process, or not all your records upload successfully, check out this article.
Import log
The import log contains a complete list of any time data has been imported into your system. It’s a great way to track when data has been imported, by who, and to where. You can open the import log at any time by clicking the settings gear on the top right of any system page and then selecting the Tools tab from the left sidebar menu. The Import page will open by default, where you’ll find the Import Log section.
.png)
Import log details
Each row in the import log represents a single time that data was imported, and contains the following details from the column headers:
- File Name: The name of the file which was imported.
- Import Type: This will display Import if the import created new records and Update if existing records were updated.
- Date: The exact date and time when the import process started.
- Object: The object which records were added to or updated in.
- Status: This will display Finished if the import finished successfully, Failed if the import did not complete successfully, Initializing at the start of the import, In progress if the import is still processing, Deleting while a reversion is in process, and Deleted if the import has been fully reverted. Read about reverted imports below.
- Result: This will display the total amount of records in the file, followed by the amount of records which have been processed successfully. You can use this to check the progression of your import. If an import has been reverted, a download symbol will be found after this text where you can download a copy of the changes.
Revert an import
For the first 24 hours after an import has finished processing, you’ll be given the option to revert the changes made to the system. This option will only exist for records which have been newly created in your system, and may be useful if you’ve uploaded the wrong file or forgotten to add a column. You cannot revert any updates which were imported to existing records. After the import process has completed, you’ll see a blue Revert button on the far right of the import row. You can click this button to delete all the newly imported records. A pop up will open displaying the total amount of records which will be deleted. To complete the process, type DELETE into the pop up and then click the red Delete button. After reverting an import successfully, the status column will change to Deleted and you’ll find a download button to the right of the Result column. By clicking on it, you can download a CSV file with all the records which have been deleted from your system.
